
Hello everybody! Running a Minecraft server for you and your friends is one of those projects that starts out easy and then hits a wall. The server itself takes about five minutes. Getting everybody else onto it is where people get stuck, because suddenly you're writing port forwarding rules on your router and pasting your home IP address into a group chat.
And plenty of folks can't port forward at all. If your ISP has you behind CGNAT, which is extremely common on fiber and mobile connections now, there is no public IP pointing at your house to forward anything to. You're just out of luck before you start.
So we're going to do this a different way. We'll run the Minecraft server in Docker, join it to a NetBird network, and publish that one game port through the NetBird reverse proxy. Nothing gets opened on your home router, your home IP never leaves your house, and as an added bonus your friends don't install anything at all. They get an address and a port, they paste it into Minecraft, and they're in. Let's get started.
How This Actually Works
There are two ways to let people in here, and they pull against each other. One is more secure, the other is a lot easier on your friends.
Either way your server joins your NetBird network and nothing gets opened on your router. Your home network only ever makes an outbound connection, and that is exactly why both of these work behind CGNAT. What changes is where your friends sit.
Option A is the normal NetBird setup, and it's the more secure of the two. Your friends install the client, join your network, and connect to the server by its NetBird name. Nothing is public, no port exists on the internet, and you don't need Minecraft's whitelist at all, because being on the network is the permission. The cost is that everybody has to install one thing, and that their machines are now sitting on the same network as your NAS and your hypervisor. There's a policy to write for that, and we'll write it.
Option B is the reverse proxy, and it flips the model around. The proxy sits out on the internet with a real address, accepts the incoming connection, and carries it back to your server through the NetBird tunnel. Your friends install nothing at all. They get an address and a port, they paste it into Minecraft, and they're in. The cost is that the game port really is public once you're done, the same as if you had forwarded it. What you're still avoiding is exposing your home connection, not exposing the game.
For a group of friends who just want to play on a Tuesday night, Option B is usually what wins, and it's the bigger half of this guide. Just go in knowing that convenience is costing you a public port, which is why the whitelist over there isn't optional. The server gets built once either way, so you can stop at whichever one fits your group. Option A goes first since it's the shorter one, and the hardening we do after it carries into Option B unchanged.
What You'll Need
- A machine running Docker. I'm doing this on a VM on my Proxmox box, and if that's new to you, our Proxmox getting started guide is a great place to start.
- At least 4 gigs of free RAM. Minecraft is the memory hog here, not Docker.
- NetBird, either NetBird Cloud or self-hosted . You'll want the Services permission on your account, which means the Network Admin role or higher.
- A domain, but only if you want one. Cloud accounts get a free proxy domain automatically, and self-hosted deployments get one from your own proxy cluster. Bringing your own custom domain is optional.
Self-hosters, one heads up before you start. The reverse proxy is a separate instance, and it needs Traefik out front because it relies on TLS passthrough. If you deployed with the setup script from v0.65.0 or later and picked the built-in Traefik option, you already have it. If you're on an older deployment, NetBird's reverse proxy docs have a migration guide for adding it.
A basic understanding of Docker Compose is a prerequisite here, but nothing fancy is going on. If you want the concepts first, start with our getting started with Docker guide .
Spinning Up the Minecraft Server
We're using the itzg Minecraft server image , which is one of the most maintained one out there and handles all the annoying setup for you.
Go ahead and make a folder for it. I keep my Compose files under , so:
Then drop this in:
That's the upstream quickstart with a few changes. is the interesting one and I'll come back to it in a second. The image defaults to a 1G Java heap, which gets rough once a few people are on and chunks start loading, so bumps it to 4G. Set that to whatever your box can actually spare. The quickstart also ships without a restart policy, so is there to bring the server back after a reboot, and just saves you typing later.
The line is you accepting Mojang's EULA , which the image requires before it will start.
The upstream quickstart also carries and , which exist so you can attach to the container console directly. I've left them out, because attaching is an easy way to shut your server down by accident and there's a better way in that we'll get to shortly.
Now, . Paper is a drop-in replacement for the official server that handles a group of people online at once far better than vanilla does, and it's what most self-hosted servers end up running. It also runs plugins, which we'll touch on near the end. Your friends still connect with the normal Minecraft client either way. If you'd rather have the official server, comment out the Paper line and uncomment the one sitting right under it, though you'll be giving up the plugin section later on.
One caveat that comes with Paper. Paper builds trail new Minecraft releases by a bit, so if a version just dropped and the container won't come up, pin to the previous release and you'll be fine until Paper catches up.
Where Your Settings Live
Just about everything you'd normally put in gets set here in Compose instead, and the image writes that file out for you on every start. Getting that straight now saves a lot of confusion later. That makes this one file the thing that describes your entire server, which is real nice when you want to rebuild it or move it to another box.
Do note that this cuts both ways. Anything you set here gets reapplied every time the container starts, so hand editing that same setting in gets quietly reverted on your next restart. Settings you never put in Compose are left alone though, so editing those directly is fine. Plugin configs are a separate thing entirely and live in files under , which we'll get to later on.
Bringing It Up
Bring it up:
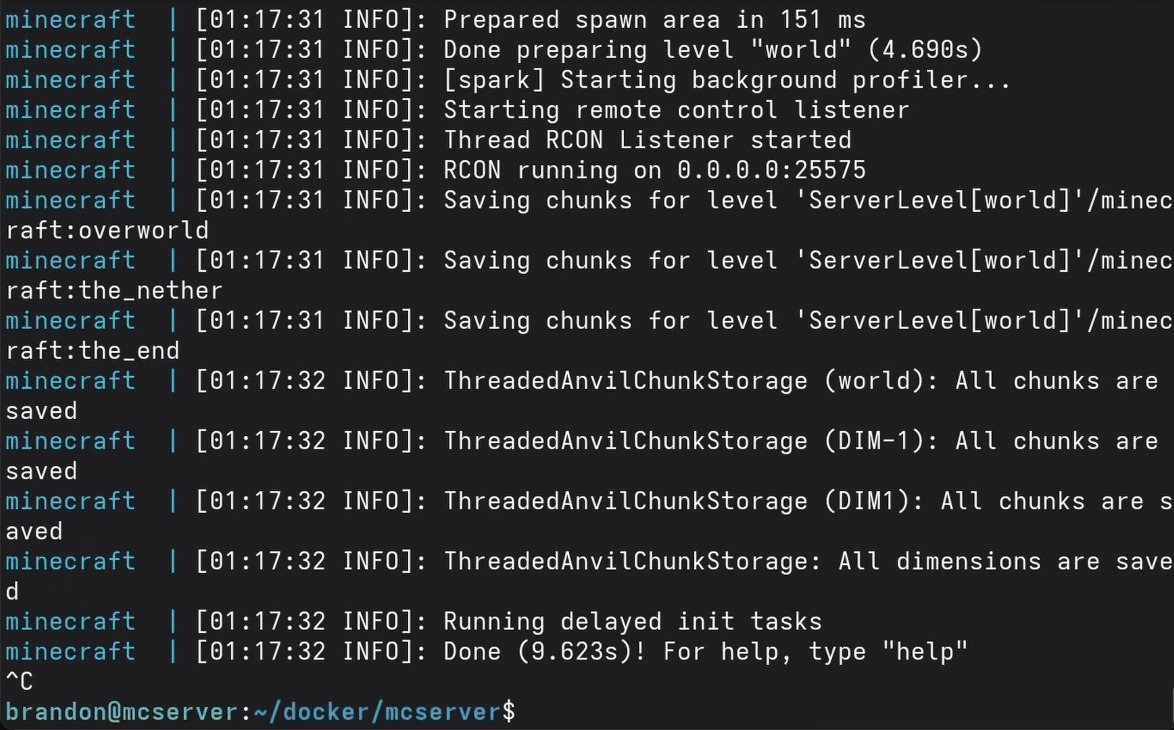
First boot pulls the image and generates the world, so give it a minute. You can watch it happen:
Once it reports that it's done and listening, you're good to go.
Test It Locally
Always worth confirming the boring part works before adding anything clever on top.
Open Minecraft, head to Multiplayer, Add Server, name it whatever you like, and for the address put in your server's local IP and port, so something like . Save that and the server should come back green with a player count.
Join it real quick and make sure you actually spawn in. If that works, the Minecraft half of this project is finished and everything from here is just plumbing.
Getting to the Server Console
A lot of server commands are easier to run from the console than from in game, so it's worth knowing how to get there before we go any further:
That goes through RCON, which this image turns on by default, and it drops you right into the server console. You type commands the same as you would in game, just without the leading slash, and Ctrl+D gets you back out.
The is what makes it interactive. Leave it off and you can fire a single command and land straight back in your shell, so to see who's online. That one is real handy in scripts.
Adding the Server to NetBird
Now we get your server onto the network, and the dashboard does most of the work here. Go to Peers, click Add Peer, and hit Generate Key. Pick the Linux tab and it lays out all three steps with a key already made for you.
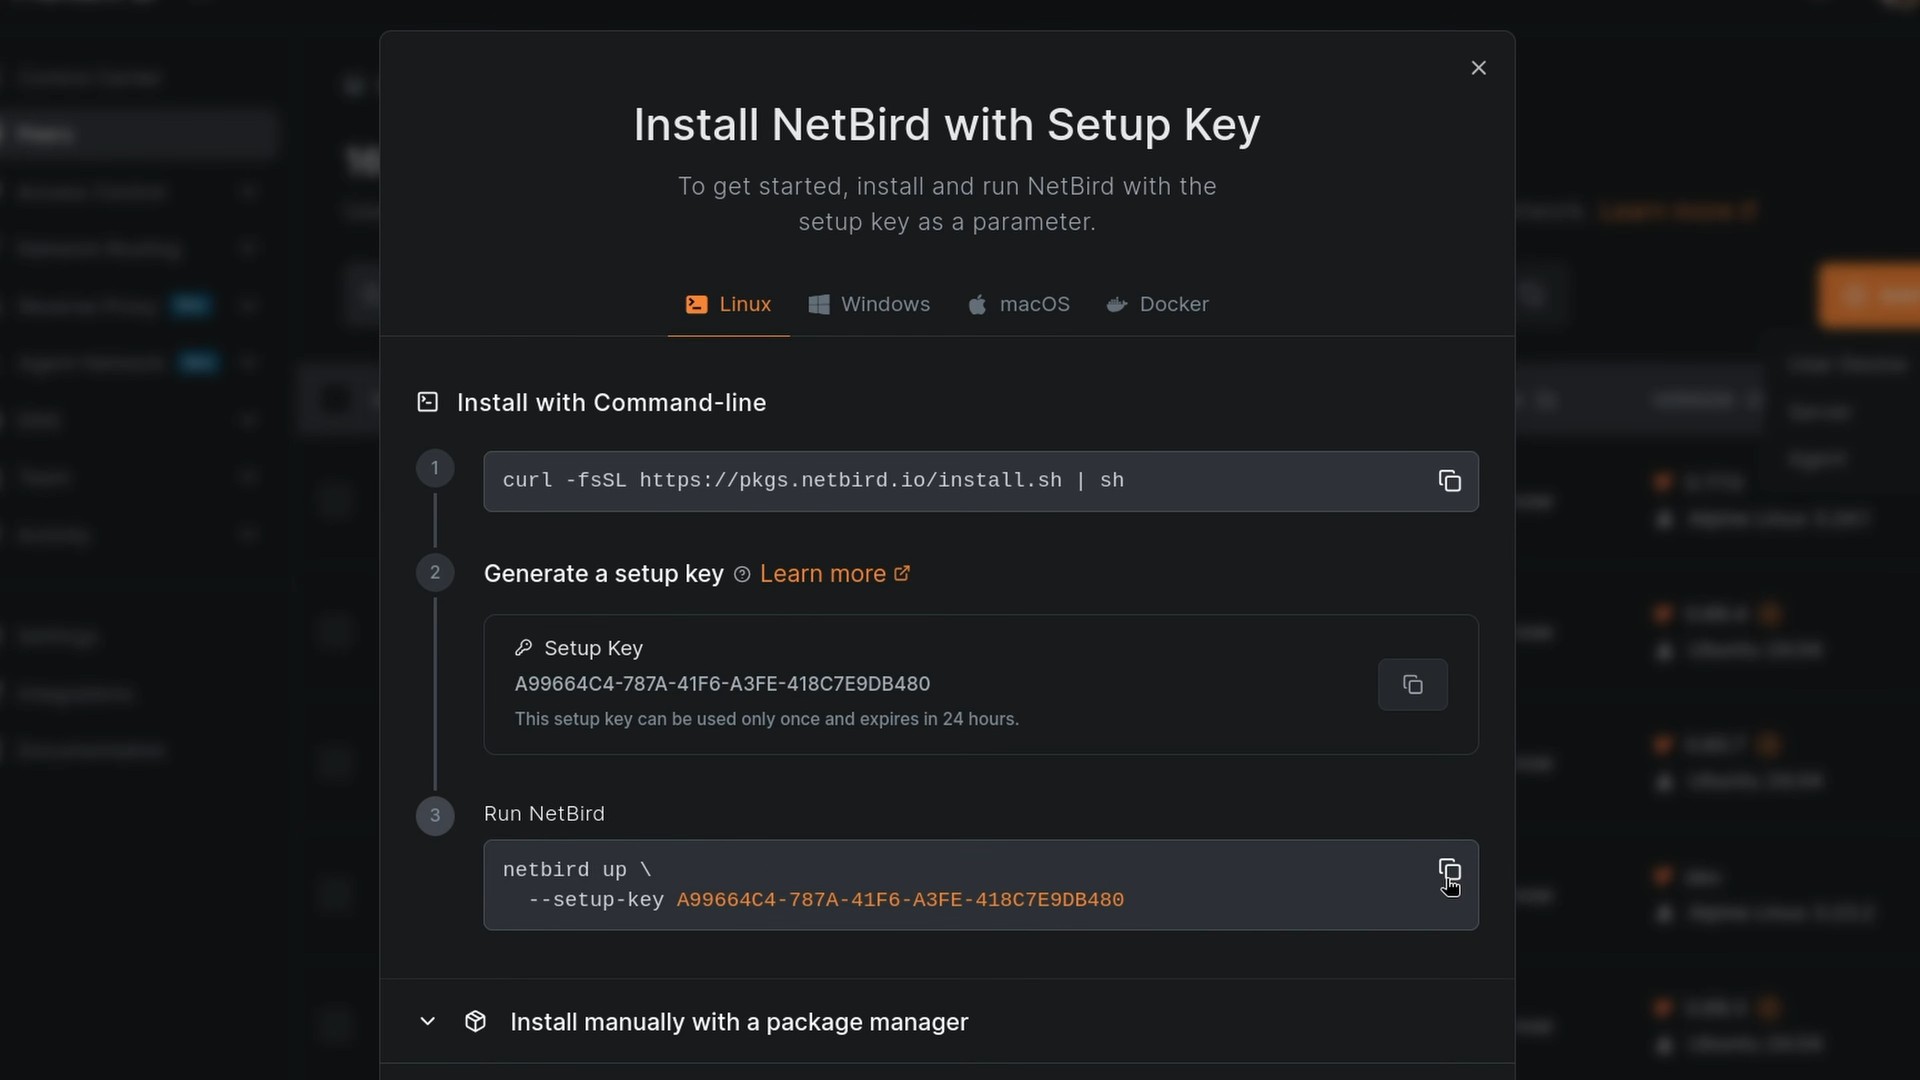
Copy the install command and run it on your server:
Then the second command, which already has the key filled in:
That key is one-off and expires in 24 hours, which is exactly what you want for enrolling a single box.
Confirm it took:
Back in the dashboard your server shows up under Peers, and the setup key shows as used.
Option A: Put Your Friends on the Network
We'll start here because it's the shorter path and it exposes the least. Your friends install the NetBird client, join your network, and connect straight to the server. Nothing goes public at any point.
Getting Them On
Start by putting the server in a group, so the policy later has something to point at. Go to Peers, click your Minecraft server, and under Assigned Groups add one called .
Now your friends. These are people, not servers, so each one gets their own user account rather than a shared key. That way you can see who is who, and you can cut one person off later without touching anybody else.
On NetBird Cloud, go to Team, then Users, and click Invite User. Put in their name and email, and in that same window add them to a group called , typing the name and pressing Enter to create it. Set their role to User, which is the most limited one on offer. A User sees their own machines and nothing else, so no access control, no setup keys, no reverse proxy, and none of your other peers.
Do note you can't invite somebody who already has their own NetBird account, and each invite takes a user seat, so check what your plan allows before you invite six people.
Self-hosting, the same idea runs through NetBird's built-in local users, which hand you an invite link to pass along instead of sending an email. The local users docs cover the setup. If you've wired up your own identity provider instead, create the user over there and they'll land in your network when they log in.
Then they install the client from app.netbird.io/install , or the page on your own dashboard if you're self-hosting. The install docs cover everything else. They sign in the way they'd sign in to anything, and their machine drops into the group on its own.
Connecting
Your friends don't need an IP address either, they get a name. NetBird hands every peer a DNS name in your own private space, so a box with the hostname is reachable at , or on a self-hosted deployment. The exact name is on the peer in the dashboard, and prints it as on the server itself.
So in Minecraft, Multiplayer, Add Server, and the address is:
That name only resolves for machines on your network.
And no whitelist needed here. Being on the network is the permission, so there's nothing to set on the Minecraft side at all.
Don't Skip the Policy
Nothing here is exposed to the internet, but your friends' machines are on your network, and what they can reach is whatever your access control allows. With a NAS and a hypervisor sitting in there too, "can play Minecraft" is worth spelling out.
Go to Access Control, then Policies, and click Add Policy:
- Source: the group
- Destination: the group
- Protocol: TCP, with in the Ports field
- Direction: unidirectional, so your friends can reach the server and the server can't reach back into their machines
Name it something obvious like and save it.
Do note that a new account ships with a policy called that lets every peer reach every other peer, so this new one won't change a thing while is still switched on. Being able to leave it off for good means writing a policy for each thing you actually reach, your NAS from your laptop and so on down the list. Once those exist, stays off and every policy says exactly who gets what. NetBird's access control docs cover how they combine.
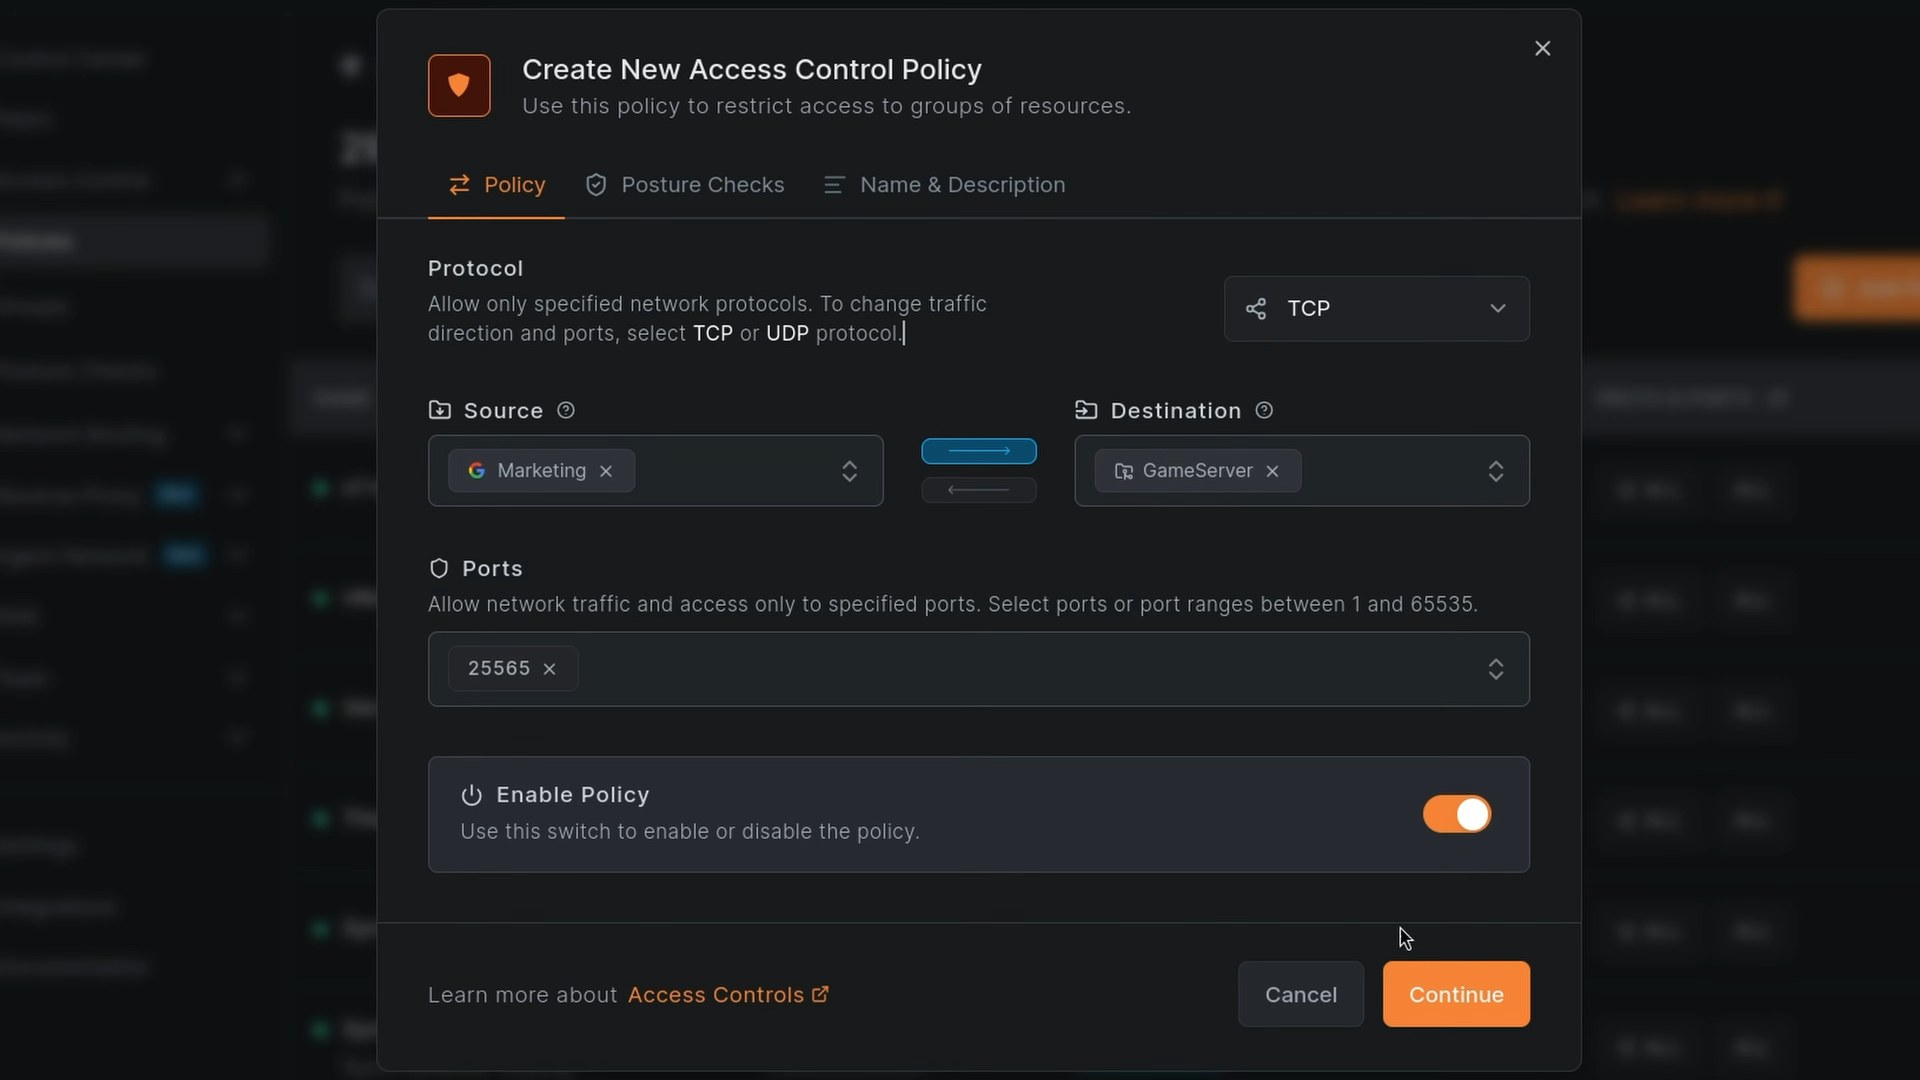
Do note the source group in that screenshot says , which came synced in from our identity provider rather than being made by hand. Yours will say . If pulling groups straight from your IdP sounds useful, the IdP sync docs walk through it.
Test It
Go to Peers, find your own machine, and add to its Assigned Groups. Then add the server by its NetBird name and you should spawn in, which is the policy doing its job on the allow side. Take yourself back out of the group once you've seen it work.
For the other half, the bit where your friends shouldn't reach anything else, take that machine out of its other groups so is all it has left. Groups stack, so anything else it belongs to is still handing it access.
One thing will still get in the way. Every peer sits in the group automatically and you can't take it out of that one, so has to be off for any of this to bite. Flip it off with the toggle in the Active column on the Policies tab, then try loading your NAS page again. If it doesn't come up, your policy is the one deciding. Do check that your other machines are covered by a policy before you flip it, or you'll cut yourself off from your own network.
Binding the Port to NetBird Only
Whichever option you're going with, we can harden this install, and it's a quick edit in the compose file.
That we wrote back at the start publishes the game port on every interface the box has. Nothing outside the tunnel needs to reach it though. Under Option A your friends arrive over NetBird, and under Option B the proxy does too, so the NetBird address is the only one that has to answer. Everything else is surface you aren't using.
Grab the server's NetBird IP:
That prints the bare address, something like . You'll also find it on the peer in the dashboard, and it stays with that peer, so it's safe to write into a file.
Then put it in front of the port in your Compose file:
Apply it with . Changing a port binding recreates the container, which is nothing to worry about since your world lives in . Go ahead and reconnect real quick to confirm. And this doesn't get in the way of Option B further down, since the proxy reaches your server over the tunnel at this same address.
What this does is stop your server from listening anywhere it has no reason to. A second NIC, a stray port forward, or anything else sitting on your LAN can't reach it directly anymore. Do note it isn't what keeps strangers out under Option B, since the game port is still public through the proxy. That's the whitelist coming up.
Two gotchas come with it. The first is that this takes away the local IP connection we tested with earlier, so if you want machines at home hitting the server directly, publish on both addresses:
Still a lot narrower than leaving it wide open, and it keeps the DNS trick further down working.
The other is boot order. Docker binds that address the moment the container starts, so if it gets there before NetBird has the interface up, it fails with . If it hasn't sorted itself out a minute after a reboot, a gets it going.
Option B: Publishing It With the Reverse Proxy
Now the other path, and the one most people come here for. Your friends install nothing at all.
The NetBird reverse proxy isn't just an HTTP thing. It also does Layer 4, meaning raw TCP and UDP, which is exactly what a game server needs.
Before we turn any of that on though, one thing first.
Turn On the Whitelist First
The moment that proxy service exists, your game port is public. So we set the whitelist now rather than after, which costs nothing and means there's never a window where somebody who stumbles onto the port can walk straight in.
This is the one I would not skip, since it filters on who somebody actually is rather than where they happen to be connecting from. Add this to your Compose environment:
Then to apply it. Setting is enough to turn whitelisting on by itself, and makes changes take effect immediately when you edit the list in game rather than waiting for a restart. The itzg docs put a warning on this section for public servers, and that's exactly the situation we're about to build.
Do note that those need to be Minecraft: Java Edition profile names, not Xbox gamertags. They can be different even on the same Microsoft account, and a wrong name here just silently doesn't match. Also leave alone, since it defaults to on and means Mojang actually verifies your players are who they say they are.
One more thing on that list. Adding somebody in game with sticks just fine, since the image merges your Compose list into the existing file rather than replacing it. Removing somebody is the one that gets people. If you kick them out in game but their name is still sitting in , they come right back on the next restart. So pull them from the Compose file too, which is that same source of truth idea from earlier.
Creating the Service
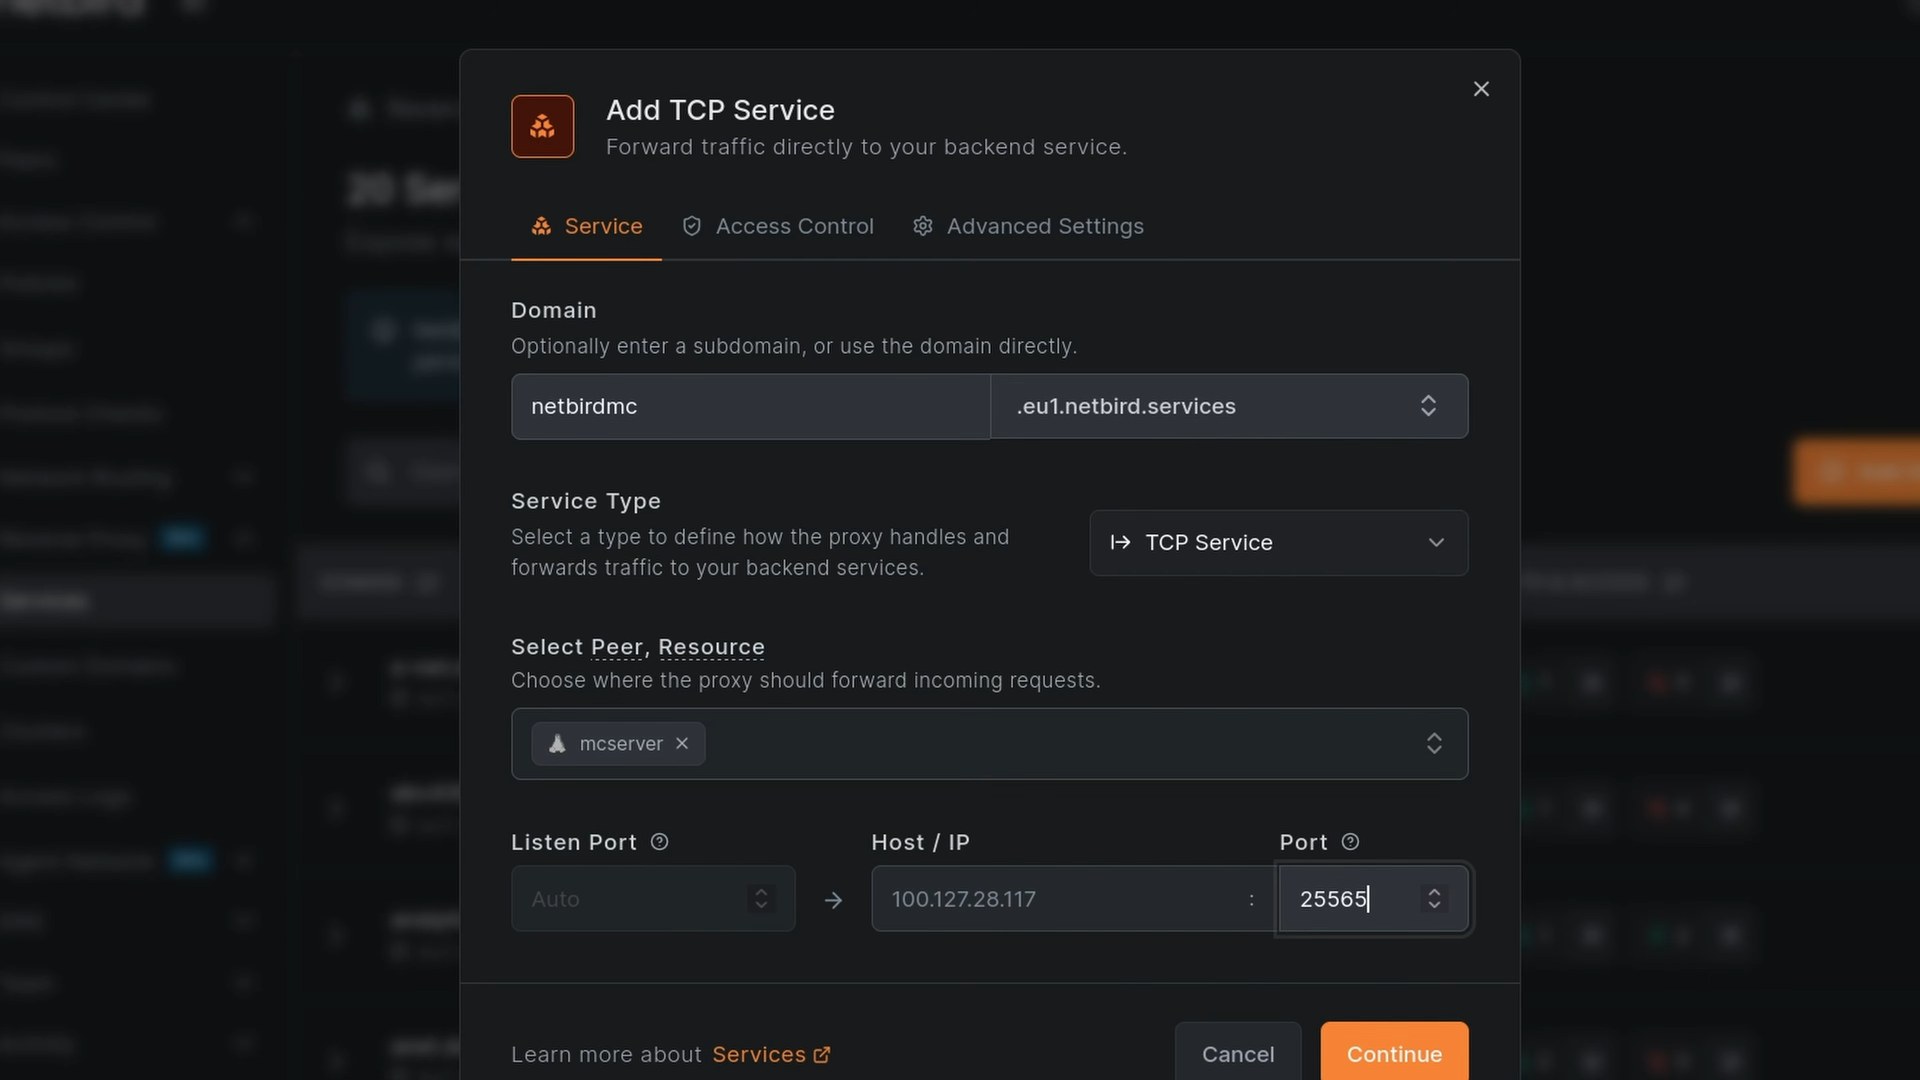
Head to Reverse Proxy, then Services, and click Add Service. On the Details tab:
- Service mode: pick TCP. This trips people up, because HTTP is the mode you'd use for a web dashboard and it's the one most tutorials show. Minecraft: Java Edition speaks its own protocol over plain TCP, so there's nothing for TLS termination to do here. There's a UDP mode too, which is what you'd want for a lot of other games.
- Subdomain and base domain: together these make the address your friends type. Cloud accounts get a free domain like , self-hosted picks up a domain from your proxy cluster, or you can select a custom domain you've already added.
- Listen port: the port people connect to from outside. More on this in a second.
- Add Target: choose type Peer, pick the Minecraft server we just enrolled, and set the target port to . That's the port the game is actually listening on back home.
Now, that listen port. How you get one depends on the proxy cluster, and the dashboard tells you which behavior you're getting when you select the domain:
- Auto-assigned, which is how NetBird's shared cloud clusters work, since ports have to be managed to avoid collisions between accounts. The field is read-only and you're shown the assigned port after the service is created. It'll be some unfamiliar number, and that's fine, your friends just use whatever it gives you.
- Custom, which self-hosted clusters support when configured for it. Here you may as well use on both sides and keep it simple.
A plain TCP service gets routed purely by port, not by hostname, and that one fact explains most of the rules here. HTTP and TLS services can share the proxy's main port because the proxy reads the SNI hostname out of the TLS handshake, but Minecraft isn't sending TLS at all, so there's nothing to inspect. The domain is really just friendly DNS pointing at your proxy, and the port is what identifies the service. That's why each port on a cluster can only belong to one service, and why a second Minecraft server means a second port.
Click through the tabs to finish, and your service appears with its domain and port. Give it a moment to show as .
One Extra Step If You're Self-Hosting
This one will absolutely get you if you skip it. A default self-hosted Compose stack only routes port 443 through to the proxy container, so any other port an L4 service listens on has to be published on that container yourself.
On your NetBird server, open the Compose file, find the service, and add your port to its section alongside what's already there:
If you're publishing a game that runs over UDP instead, that's .
Save it, then restart just that one service:
Now the proxy is actually listening and can catch the incoming connections. On NetBird Cloud you skip all of this, since the assigned port is already handled for you.
Leave PROXY Protocol Off
There's a setting on the Settings tab called PROXY Protocol, available for TCP and TLS services, and for Minecraft you want it off.
When enabled, the proxy prepends a PROXY Protocol v2 header so your backend can see the real client IP instead of the proxy's. Genuinely useful when the backend understands it. Minecraft does not, so it reads those extra bytes as a malformed handshake and connections just fail. If you flip it on and suddenly nobody can join, there's your culprit.
The tradeoff of leaving it off is that your server sees every player as coming from the proxy's address. So per-player IPs won't be meaningful in your logs, and an IP ban would catch everybody at once. Use the whitelist and in-game bans instead, which work on accounts and don't care about any of this.
Testing From Outside
This part is worth doing properly, because testing from your own network proves nothing.
Get a machine actually off your network. Tethering a laptop to your phone's hotspot is the easiest way to be sure. Then in Minecraft, Multiplayer, Direct Connection, and paste in the address and port from your reverse proxy service, so something like . That port is the unfamiliar number the cluster assigned back when we created the service.
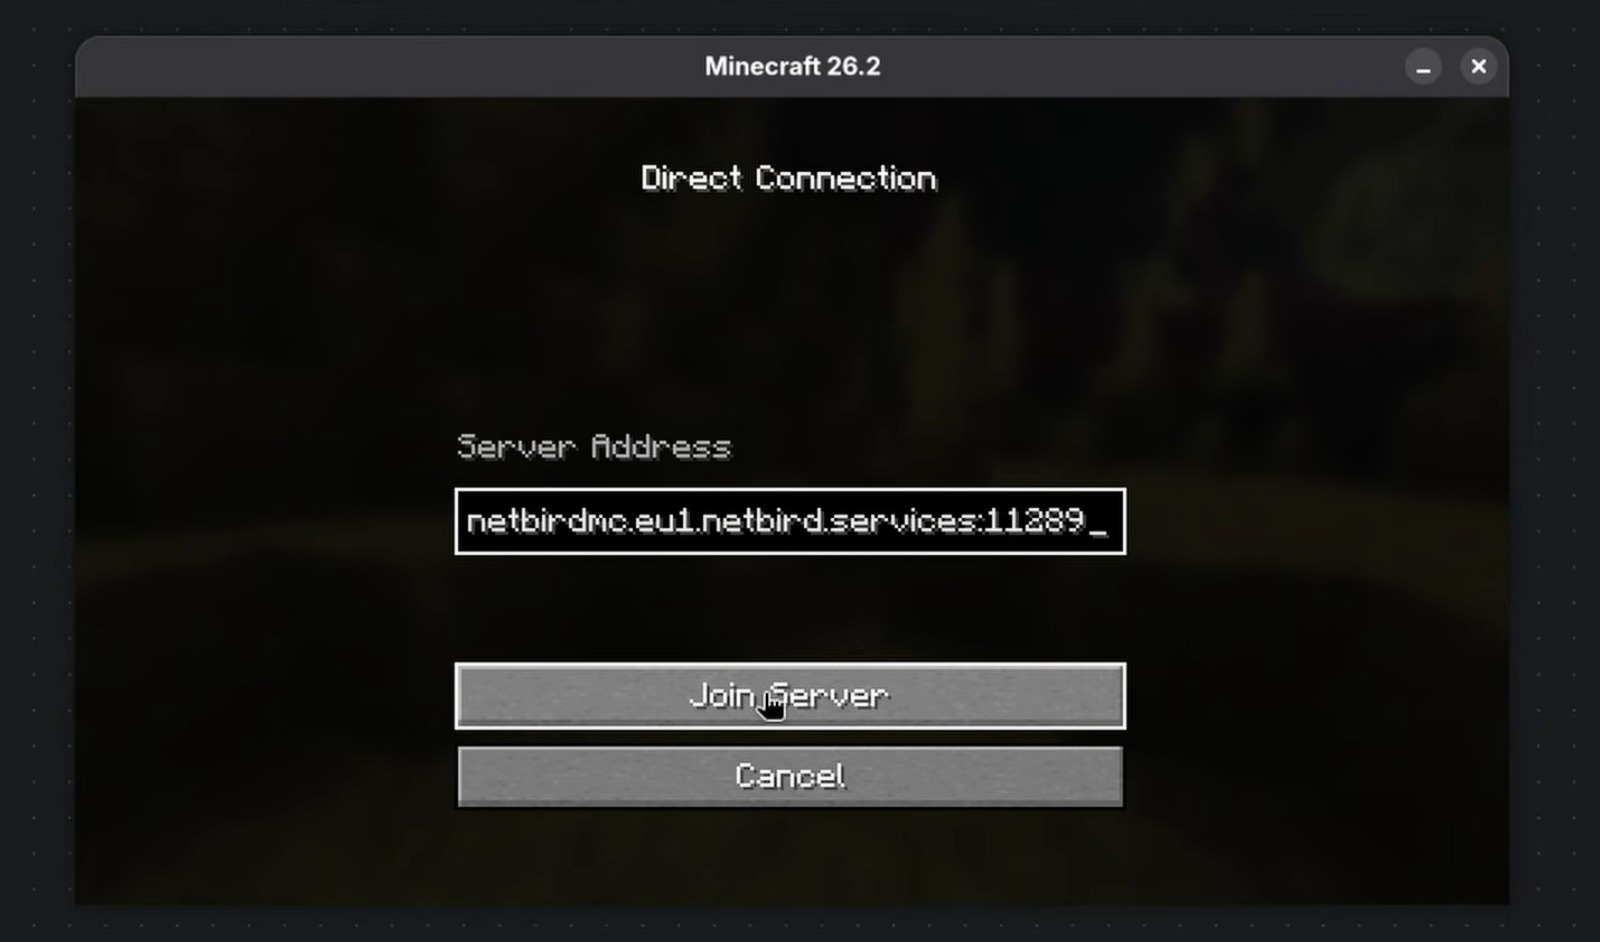
And just like that, we're in. That connection came in from the open internet, landed on the proxy, and got carried back through NetBird to a server sitting behind a router with nothing forwarded on it.
What About Latency?
Fair question, and the first one I got asked after this went up. If your friends are in the US and the proxy is sitting in the EU, their traffic crosses the Atlantic to reach it and then comes right back through the tunnel to your server. Written out like that it sounds like a deal breaker.
I built and tested this whole thing from the US on an EU cluster, and it wasn't one. The ping number goes up, but Java Edition predicts your movement locally and reconciles after the fact, so the extra distance turns into slightly late mob hits and block breaks rather than the rubber banding you're picturing. Where you would feel it is PvP or tight redstone timing, and that's where Option A earns its keep, since those connections go peer to peer with no proxy in the middle.
Worth a look at which domains your account is offered when you create the service, since the cluster is part of that hostname. And if you want the proxy somewhere specific, Bring Your Own Proxy lets you run your own instance in whatever region you like and bind it to your account, cloud or self-hosted either way. It's in beta, and it wants a server with a public IP and a domain you control. Do note that Minecraft's patience with ping isn't universal though, so if you reuse this for a shooter, test that before you invite everybody.
A Nice Tip for Playing at Home
Small thing that's real nice to have. When you're sitting at home, you don't want your own traffic going out to the proxy and coming all the way back to reach a server that's fifteen feet away.
If you run your own DNS server, this is a two second fix. In AdGuard Home you'd add a DNS rewrite, and Technitium and Pi-hole both have their own version of the same thing. Point your proxy hostname at the server's local IP address, so . If you bound the game port to your NetBird address up above, you'll want that second local binding in place for this to land anywhere.
Now your machines at home resolve that name straight to the local box and connect directly, while everyone outside still resolves it normally and comes in through the proxy. Same address for everybody, shortest path for each. Do note this works cleanly when your listen port and your local port match, so it's a self-hosted trick more than a cloud one. If you want more on the DNS side, we've got a whole guide on AdGuard Home .
Adding Plugins
Here's where picking Paper starts paying for itself. Plugins are a whole rabbit hole of their own and I'm not going to walk you down it here, but you should know the door is there and, more importantly, know the one thing that trips everybody up on the way in.
The easy part first. The itzg image installs plugins for you straight from Modrinth , so you never download a jar or touch a folder. You give it a comma separated list of project slugs, where the slug is the last piece of the plugin's URL:
Restart and they land in . That's all there is to the mechanics.
Pinning Your Minecraft Version for Plugins
Plugin builds have to match your Minecraft version, and plugin authors update on their own schedule after a release lands, never before it. That's not some awkward week we happen to be in right now, it's how this has always worked and how it'll keep working.
So the moment you want plugins, latest stops being the version you want. You pin in your Compose file to a release your plugins actually support, and the plugin list follows the server version rather than the other way around:
To pick your number, go to your plugin's Modrinth page, open the Versions tab, and take the newest Minecraft version listed on its latest release. Checking a few plugins? Use the oldest of what you find.
Do check Modrinth specifically, not the plugin's own compatibility page. A project will happily tell you it supports a Minecraft version that its last Modrinth release doesn't carry a file for yet, because that support is sitting in dev builds. We're installing from Modrinth, so Modrinth's listing is what decides whether this works.
And do this before you generate a world. Minecraft won't load a world on a server older than the one that made it, so pinning backward after you've been playing means starting the world over. It's the one part of this you can't easily walk back, which is why it's worth a decision now even if plugins are a someday thing.
When a version and a plugin don't line up, the container won't start at all, and with it sits there retrying every few seconds. You'll see something like scrolling past. Drop to something supported and it comes right up.
One last thing. Pinning the server back doesn't mean anybody has to downgrade their client, which is usually the objection. A plugin called ViaVersion translates between protocol versions so newer clients connect to your older server without noticing, and it's worth adding to basically any pinned server.
Some Worth a Look
These are the ones I'd actually consider for a small group:
- EssentialsX () — the one nearly every server ends up running. Adds , , and for teleport requests, which is most of what a small group actually wants.
- CoreProtect () — logs every block placed and broken and lets you roll it back. On a server that's now reachable from the internet this is the one I'd add next, and it only records what happens after you install it, so earlier is better.
- LuckPerms () — permissions, and the thing every other plugin expects you to have once you want more than op or not op.
- ViaVersion () — the client version fix from just above. Do note the on the end, since it publishes as beta builds and the image takes stable releases by default.
- Chunky () — pre-generates world chunks so exploring doesn't stutter. Run it once, let it finish, forget about it.
- BlueMap () or Dynmap () — a browsable web map of your world. Do note these serve over HTTP on their own port, so publishing one means a second reverse proxy service, this time in HTTP mode.
- GriefPrevention () — land claiming so players can protect their own builds without you refereeing.
- spark () — a profiler for when things get slow and you want to know why instead of guessing.
Do note that plugins are where a server picks up most of its maintenance burden. Every one you add is another thing that can break on a Minecraft update, so a small group is usually happiest with a short list.
How Risky Is Exposing That Port?
Option B carries the same risk any public service does. A public port gets found eventually whether you advertise it or not, and Minecraft is not immune to real vulnerabilities, as Log4Shell reminded everybody in December 2021. What NetBird changes is narrower than it sometimes gets read as. Your home IP stays private and nothing is open on your router, which is most of the reason to do this instead of forwarding a port, but it doesn't make the server itself unbreakable and that box is still sitting on your network.
So treat that VM as untrusted. Putting it on its own VLAN is the mitigation worth the most here, and keeping off with the server out of any group that reaches your NAS or hypervisor does the same job on the NetBird side. Keep it patched too, since covers the server but plugins are yours to watch. And if none of that sits well, Option A is right there with nothing public at all, which is why it's the more secure of the two.
A Few Honest Caveats
Your world lives in that folder next to your Compose file, and nothing here backs it up for you. Flush everything to disk before you copy it, using that same RCON console from earlier:
Copy or snapshot the folder, then to let it resume writing. Losing a world nobody backed up is a miserable way to end a build.
Keep an eye on memory. That 4G we set is the Java heap, and the container wants a bit more than that on top. If things start stuttering when everyone's online at once, memory is the first place to look.
Wrapping Up
The thing I really like about this one is that it scales to basically any game server. Nothing we did on the networking side was Minecraft specific past the port number, and the whitelist and plugins are the only parts that wouldn't carry over. Valheim, Satisfactory, Terraria, a Palworld server, whatever your group is playing this month, it's the same TCP or UDP service pointed at a different port.
And the use cases for NetBird go well beyond gaming, obviously. You can cluster machines together, there's a Kubernetes operator , network routes for reaching devices that can't run the client, and a whole pile of enterprise features if that's your thing.
Need help? Refer to these official guides:
- itzg Minecraft Server Docs
- itzg Modrinth Plugin Auto-Install
- EssentialsX Documentation
- NetBird Reverse Proxy
- NetBird Setup Keys
- NetBird Access Control
If you get this running for your group, let me know what you're playing in the comments, I'm always curious. I do hope you have an absolutely beautiful day. Goodbye!