
AdGuard Home is one of those self-hosted services that, once you have it running, you can't imagine going back. Network-wide ad blocking, tracker filtering, modern DNS protocols like DoH and DoT out of the box, and full visibility into every DNS query on your network. The problem? It only works when you're at home. The moment you step outside your local network, your phone and laptop go back to using whatever DNS your ISP or coffee shop Wi-Fi hands out.
NetBird solves this with its DNS nameserver feature. You can configure NetBird to route DNS queries from all your peers, no matter where they are, through your AdGuard Home instance at home. No port forwarding, no exposing AdGuard Home to the public internet, and no complicated VPN gateway setup. Your devices connect to NetBird, and their DNS queries flow through your AdGuard Home automatically.
This guide walks you through setting up AdGuard Home, installing NetBird alongside it, and configuring the DNS nameserver so every device on your NetBird network gets ad-free, filtered DNS wherever it goes.
Prerequisites
Before getting started, you'll need:
- A machine on your home network to run AdGuard Home (a Raspberry Pi, a Linux VM, an LXC container, or even a Docker host)
- A NetBird account (the free tier works fine for this)
- NetBird installed on the AdGuard Home host and on any devices you want to use AdGuard Home from remotely
Step 1: Install AdGuard Home
If you already have AdGuard Home running, skip ahead to Step 2. Otherwise, pick whichever of the methods below fits your hardware. Any of them gets you to the same place: a working AdGuard Home instance on your home network with the admin dashboard reachable in a browser.
Option A: Raspberry Pi
A Raspberry Pi is one of the most popular ways to run AdGuard Home, and for good reason. It's low power, dead simple, and can just sit plugged into your router running 24/7.
If you're going the Pi route, start by flashing an OS using Raspberry Pi Imager . Download and install the Imager on your computer, insert your microSD card, and select Raspberry Pi OS Lite (64-bit) as the operating system. Before writing, click the gear icon to pre-configure your Wi-Fi credentials, enable SSH, and set a username and password. This saves you from needing a monitor and keyboard for initial setup.
Once the card is flashed, pop it into your Pi, power it on, and SSH in. From there, you can install AdGuard Home natively with the official install script:
This pulls down the latest binary, installs it as a systemd service, and starts it up. AdGuard Home is a single Go binary, so there's no dependency mess to deal with. Once it's running, head to in a browser to walk through the initial setup wizard. No Docker needed.
Option B: Proxmox LXC
If you're already running Proxmox , the Proxmox VE Community Scripts project has a one-liner that spins up AdGuard Home in a fresh LXC container for you. SSH into your Proxmox host (or open the Shell from the web UI) and run:
The script walks you through container settings (storage, network, resources), pulls down a Debian template, installs AdGuard Home inside the LXC, and prints the dashboard URL when it's done. From there, you can finish the initial setup wizard in a browser just like with the other install methods.
Option C: Docker
For an existing Linux server, the fastest way to get AdGuard Home up is with Docker. Create a directory for AdGuard Home and add a compose file:
Paste in the following:
Then bring it up:
Do note that port 53 is a common one. If something else on the host is already using it (like on Ubuntu), you'll need to free it up first. On Ubuntu, you can disable the stub resolver:
Finish the Setup Wizard
Whichever install method you used, open in a browser. AdGuard Home's initial setup wizard walks you through picking an admin port (I usually leave the web UI on port 80, which we've mapped to 8080 on the host for the Docker setup), setting your admin username and password, and confirming the DNS listen port. Once you finish the wizard, the main admin dashboard is available at the URL the wizard gives you.
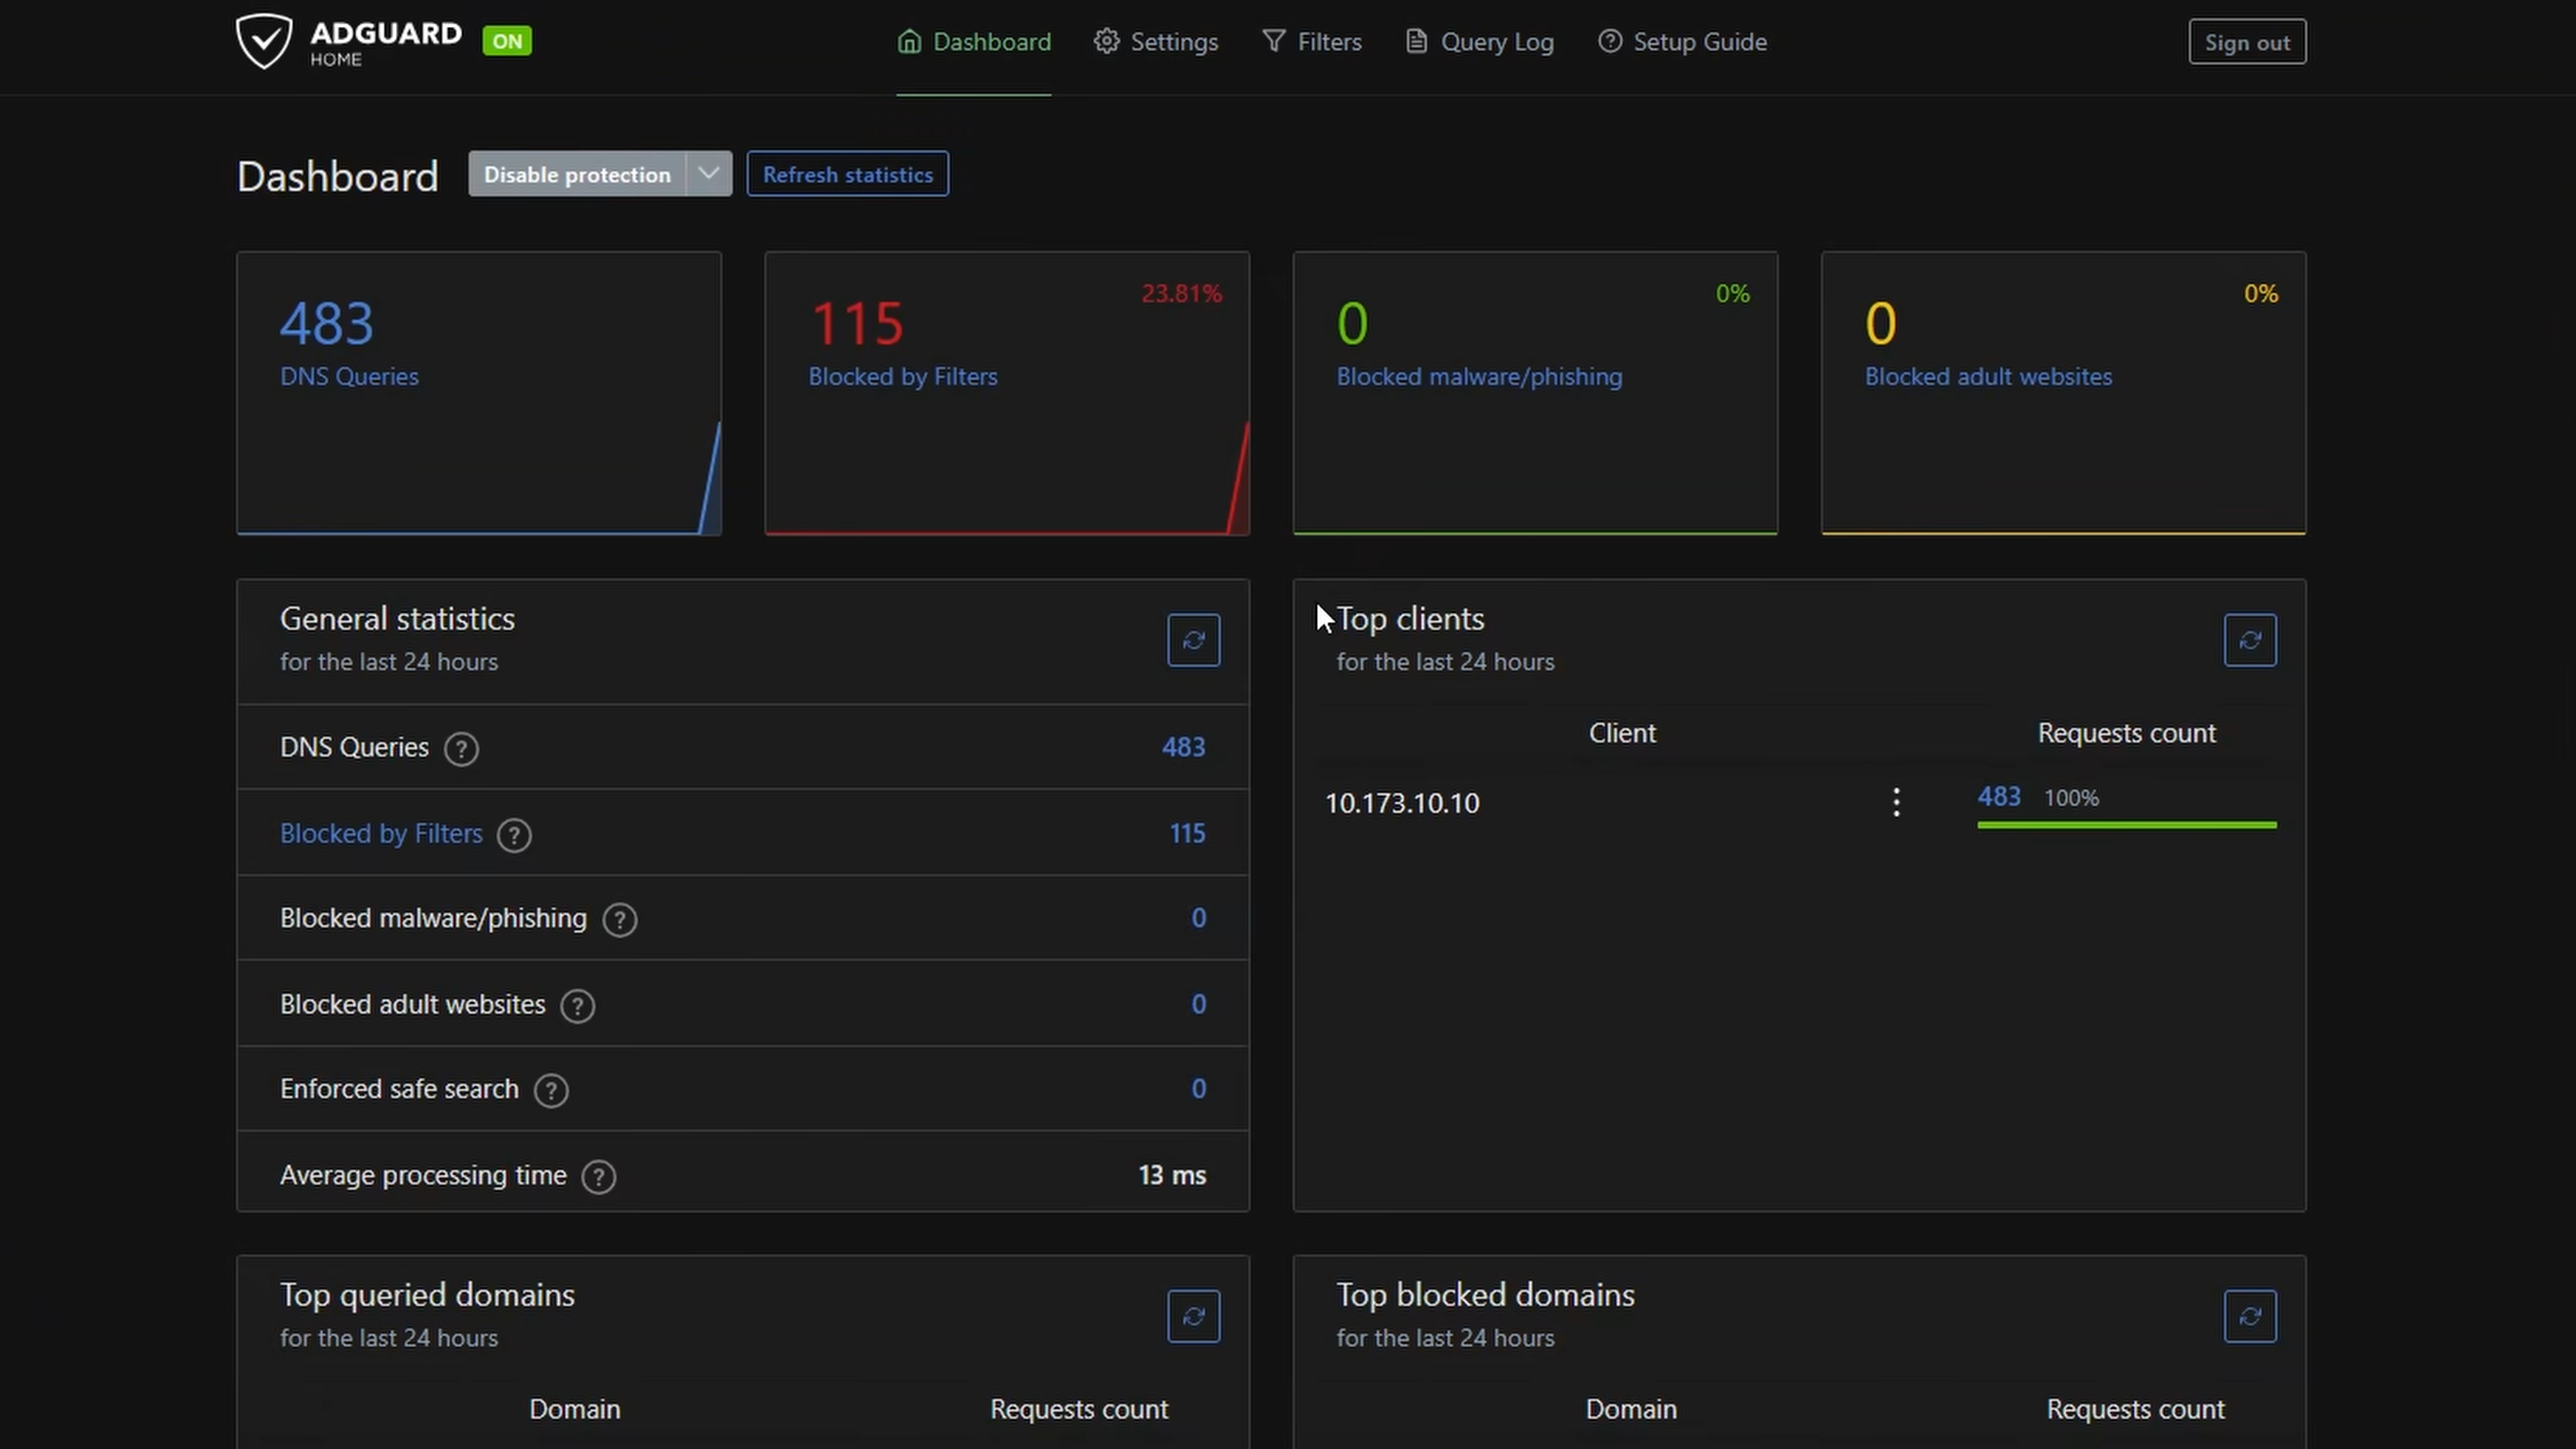
At this point, AdGuard Home is working locally. If you set your router's DNS to this machine's IP, every device on your home network gets filtered DNS. But we want more than that.
Step 2: Install NetBird on the AdGuard Home Host
NetBird needs to be running on the same machine as AdGuard Home. This machine will act as both a routing peer and the DNS resolver for your entire NetBird network.
Install NetBird:
Next, generate a setup key so the peer can register without an interactive login. In the NetBird Dashboard , go to Setup Keys, click Create Setup Key, give it a name like "AdGuard Home host," and set it to Reusable or One-off depending on your preference. Copy the key.
Back on the AdGuard Home host, use the setup key to connect:
This registers the peer and connects it to your NetBird network in one step, no browser login required. Confirm it's online:
You should see the peer connected with a NetBird IP in the range. Now grab the machine's local LAN IP as well. You'll need both in the next steps.
For example, if your AdGuard Home host is at on your home network, that's the IP we'll use for DNS.
Step 3: Add a Network Route
To make AdGuard Home reachable by its local LAN IP from remote peers, we need to set up the AdGuard Home host as a routing peer. This tells NetBird to route traffic destined for your home subnet through this machine.
- In the NetBird Dashboard , go to Network Routes.
- Click Add Route.
- Configure it:
- Network range: Your home LAN subnet (e.g., )
- Routing peer: Select your AdGuard Home host
- Distribution groups: Select the groups that should have access to this route. All works for most setups.
- Save the route.
This does two things for us. First, it lets remote peers reach AdGuard Home's DNS on its local IP through the NetBird tunnel. Second, it means devices on the home LAN can still use AdGuard Home directly without NetBird running at all, since they're just hitting a regular local IP.
Step 4: Configure NetBird DNS Nameserver
Now we tell NetBird to use AdGuard Home for DNS. Since we set up a network route in the previous step, we can point the nameserver at AdGuard Home's local LAN IP instead of its NetBird IP.
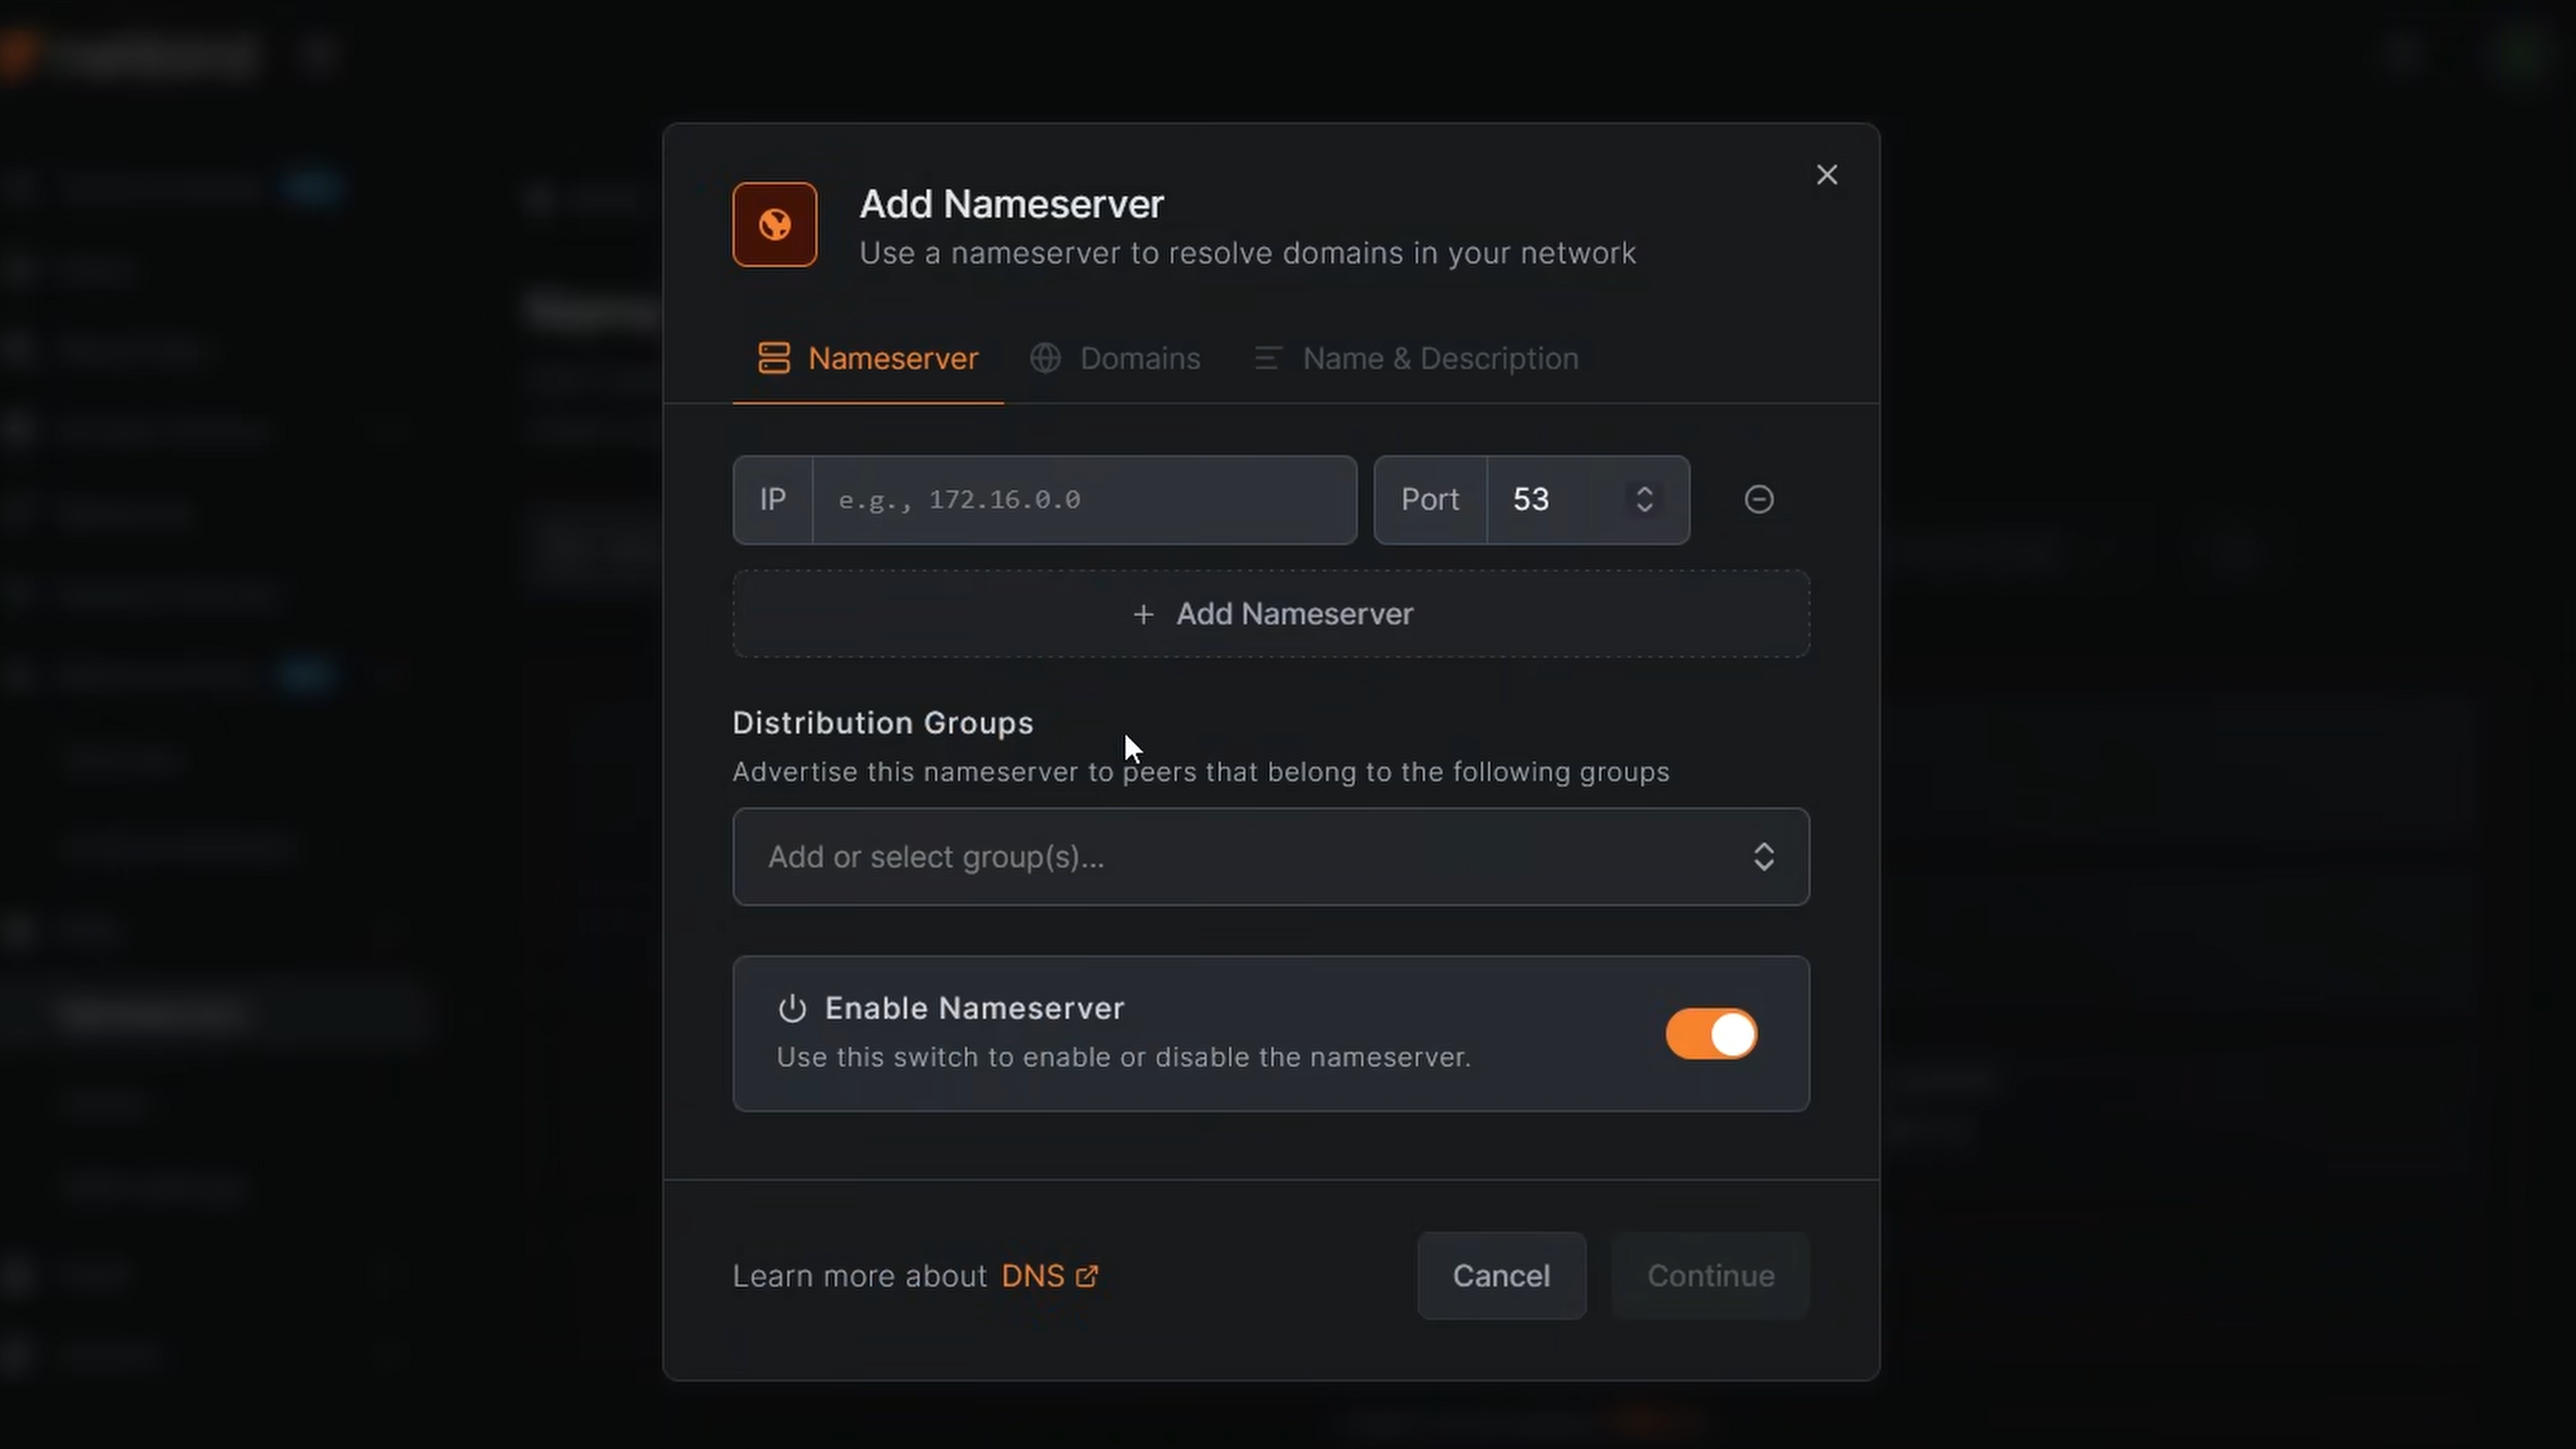
- Open the NetBird Dashboard and navigate to DNS > Nameservers.
- Click Add Nameserver.
- Configure it as follows:
- Name: AdGuard Home
- Description: Home AdGuard Home DNS
- Nameserver IP: The local LAN IP of your AdGuard Home host (e.g., )
- Port: 53
- NS Type: UDP
- Primary: Enable this toggle. A primary nameserver handles all domains that don't match a more specific rule. Since we want all DNS to go through AdGuard Home, this is what we want.
- Distribution Groups: Select the groups that should use this nameserver. For most setups, All works fine. If you only want certain devices to use AdGuard Home, create a dedicated group and assign those peers to it.
- Save the nameserver configuration.
Within a few seconds, NetBird distributes this configuration to all peers in the selected groups. Their local DNS resolver will start routing queries through the NetBird tunnel to your AdGuard Home.
Note: You could also use the AdGuard Home host's NetBird IP () as the nameserver instead of the local LAN IP. That works without setting up a network route, but it means DNS depends on the NetBird tunnel even when you're on the same local network as AdGuard Home. Using the local IP with a network route gives you the best of both worlds: remote peers reach AdGuard Home through the tunnel, and local devices hit it directly.
Step 5: Verify It's Working
On a remote device (your phone on cellular, your laptop at a coffee shop, anything not on your home network), make sure NetBird is connected, then test DNS resolution:
You should get a response. Now check that AdGuard Home is actually handling the query by opening the AdGuard Home admin dashboard at and looking at the Query Log. You should see the query from your remote device show up.
For an even quicker test, try visiting a domain you know AdGuard Home blocks (like ) and confirm it gets filtered.
On mobile, just browse normally after connecting to NetBird. If ads start disappearing from apps and websites that normally show them, AdGuard Home is doing its job.
Android users: For AdGuard Home DNS to work properly over NetBird, you need to disable Private DNS on your device. Go to Settings > Network & Internet > Private DNS and set it to Off. When Private DNS is enabled, Android bypasses VPN DNS entirely, which means your queries would skip AdGuard Home.
Optional: Add a Fallback Nameserver
If your AdGuard Home host goes down or loses connectivity, peers using it as a primary nameserver won't be able to resolve any domains. To avoid this, you can add a public DNS fallback.
One approach is to configure a second nameserver in NetBird with a public provider like Cloudflare () or Google () as a non-primary nameserver with no match domains. This way, if AdGuard Home is unreachable, peers still have working DNS.
However, keep in mind that the fallback bypasses AdGuard Home's filtering. If uptime is critical, consider running a second AdGuard Home instance (maybe in a different location) and adding both as nameservers in NetBird for redundancy with filtering intact.
How It Works Under the Hood
When you configure a primary nameserver in NetBird, the client installs a local DNS resolver on each peer. This resolver intercepts DNS queries from the operating system and routes them based on your nameserver configuration.
With AdGuard Home set as the primary nameserver and a network route pointing to its local IP, here's what happens when a remote peer makes a DNS query:
- The application sends a DNS query to the system resolver.
- NetBird's local resolver intercepts it.
- The resolver sees the nameserver IP is on a routed network and sends the query through the encrypted WireGuard tunnel to the AdGuard Home routing peer.
- The routing peer delivers the query to AdGuard Home on its local LAN IP.
- AdGuard Home processes the query, applying its filter lists and blocking rules.
- The response travels back through the tunnel to the requesting peer.
For peers on the same local network as AdGuard Home, the query goes directly to the LAN IP without touching the tunnel at all. This is the advantage of using the local IP with a network route instead of the NetBird IP: local devices get filtered DNS whether or not NetBird is connected.
All of this happens transparently. Applications don't need any special configuration. They just make DNS queries like normal, and NetBird handles the routing.
Because the DNS traffic from remote peers flows through NetBird's WireGuard tunnel, it's fully encrypted in transit. Nobody on the local network (whether that's a hotel Wi-Fi, airport hotspot, or corporate network) can see or tamper with your DNS queries.
Tips and Best Practices
Keep AdGuard Home updated. Filter lists and AdGuard Home itself get regular updates. On a native install, you can click Check for updates right in the admin UI. On Docker, pull the latest image and recreate the container:
Monitor query volume. The AdGuard Home dashboard gives you full visibility into what every device is querying. This is especially useful when you start routing remote devices through it, as you'll see exactly what your phone is doing in the background.
Use groups for granular control. If you have devices that shouldn't use AdGuard Home (maybe a work laptop that needs unfiltered DNS for corporate services), create separate NetBird groups and only distribute the AdGuard Home nameserver to the groups that should use it.
Combine with match domain nameservers. If you have internal services that need a separate DNS resolver (like Active Directory or a local DNS zone), you can add match domain nameservers alongside your AdGuard Home primary. Queries for those specific domains go to the match domain nameserver, and everything else goes to AdGuard Home.
Lean on per-client settings. One thing AdGuard Home does really nicely is per-client configuration. You can assign different filter lists, blocked services, and logging rules to individual clients based on IP or tag. Combined with NetBird's peer groups, this gives you pretty granular control over what each device sees.
Test on one peer first. Before rolling out to all your devices, configure the nameserver for a single test group, verify everything works, and then expand to your full network. This avoids a situation where a misconfiguration breaks DNS for all your peers at once.
Wrapping Up
With NetBird and AdGuard Home working together, you get network-wide ad blocking and DNS filtering that follows you everywhere. No port forwarding, no public exposure, no complicated server configuration. Just encrypted DNS queries flowing through your NetBird network to your AdGuard Home instance at home.
This is one of those setups where, once it's running, you kind of forget it's there. Ads disappear, trackers get blocked, and it all just works whether you're on your couch or halfway around the world. That's the beauty of combining self-hosted tools with zero-trust networking.
If you run into any DNS issues, check out the NetBird DNS Troubleshooting Guide for diagnostic steps. And if you want to go deeper with DNS, explore Custom DNS Zones for creating private DNS records directly in NetBird without running any external DNS servers at all.