
Streaming services keep getting more expensive, content keeps rotating off platforms, and you're still paying monthly for the privilege of watching things you've already bought. Jellyfin lets you take your own media library and turn it into something that looks and feels like Netflix, but it's running on your hardware, with your rules, and no subscription fees.
We're going to set up Jellyfin using Docker Compose through Portainer on Ubuntu Server, configure storage for your media libraries, enable Intel Quick Sync for hardware transcoding, and set up secure remote access with NetBird so you can stream from anywhere.
Installation Options
There are a bunch of different ways to install Jellyfin—Mac, Windows, various Linux distros, Docker, Synology, TrueNAS, and more. It's impossible to cover absolutely everything in one guide.
If you're running something like TrueNAS, there's a Jellyfin app you can search for and install directly. Just point it to your media and you're good to go. Same with Unraid—search for Jellyfin in the Community Applications, click install, point the data directory to where your movies and TV shows are, and that's it. Generally with any NAS operating system, the process is the same: search for Jellyfin, install, point it at your media.
If you install Jellyfin directly on Linux (not through Docker), keep in mind that you'll need to edit the systemctl service to give yourself the right permissions if you want to use features like DVR or anything that writes media or manipulates files on the system.
For this guide, we're going with Docker Compose on Ubuntu Server, which gives you the most flexibility and portability.
Why Jellyfin Over the Alternatives
The two big names in self-hosted media servers are Plex and Emby . Both are solid, but both come with caveats. Plex locks several features behind a paid Plex Pass, routes some traffic through their servers, and has been adding ad-supported content and social features that a lot of self-hosters aren't interested in. Emby went closed-source back in 2018 and also requires a paid premiere license for things like hardware transcoding and offline sync.
Jellyfin is a fork of Emby's last open-source release, created in December 2018 after Emby announced it was going closed-source. It's completely free and open source. No premium tiers, no phoning home, no accounts required. Hardware transcoding, sync play, live TV support, it's all included. The client ecosystem is broad too. There are apps for Android, iOS, Android TV, Fire TV, Roku, web browsers, and desktop platforms. It's not perfect and the UI isn't quite as polished as Plex, but the gap has been closing fast.
If you want full control over your media server with zero strings attached, Jellyfin is the way to go.
Hardware Considerations
You don't need anything exotic to run Jellyfin. If you're only doing direct play, where the client can handle the file format natively, even a Raspberry Pi could manage it. Transcoding is where hardware matters.
CPU: Any modern Intel processor with Quick Sync is the sweet spot for transcoding. Quick Sync handles video encoding and decoding in dedicated hardware on the chip, so your CPU barely breaks a sweat. Intel N100 mini PCs are incredibly popular for this since they support AV1 decoding and are cheap and power-efficient. AMD processors work too, but Intel's Quick Sync support in Jellyfin is more mature. Nvidia GPUs are also a solid option for hardware transcoding if you have one available.
Hardware transcoding isn't strictly necessary—you won't need it all the time. It's most helpful when you have something like a 4K video and want to stream it to your phone at 720p to save data, or when you have a file format that an older smart TV doesn't natively support. If all your clients can direct play your media, you can skip it entirely.
RAM: 4GB is the minimum, 8GB is comfortable. Jellyfin itself isn't memory-hungry, but if you're running other containers alongside it, give yourself headroom.
Storage: This is the big one. Media libraries get large fast. A single 4K movie can be 50-80GB. A full TV series in 1080p can easily hit 100GB+. Plan your storage around what you actually have and what you plan to collect. If you're running this alongside a NAS like TrueNAS or Unraid , you can mount network shares for the media while keeping Jellyfin's config on local SSD storage.
Network: Gigabit ethernet is the minimum for a good experience. If you're streaming 4K remuxes, you'll want that wired connection. WiFi can work for lower bitrate content, but wired is always better for a media server.
Setting Up Ubuntu Server
I'm running this on Ubuntu Server as a VM, but bare metal works the same way. If you need a full walkthrough of the Ubuntu Server installation process, I covered that in detail in the Docker guide . The short version:
- Download the Ubuntu Server ISO and flash it with Etcher or Rufus
- During installation, enable the OpenSSH server and skip the snap packages
- Boot in, check your IP with , and set a static IP through your router
- Update everything:
That's it for the base OS. Let's get Docker going.
Installing Docker & Portainer
I covered Docker and Portainer installation in detail in the getting started with Docker guide , so I won't repeat all of that here. The short version is you run Docker's convenience script, add your user to the docker group, then spin up Portainer Community Edition. Once Portainer is running, access it at and create your admin account.
The Docker Compose Stack
We'll use Portainer's Stack feature to deploy Jellyfin. In Portainer:
- Go to Stacks in the left sidebar
- Click Add stack
- Give it a name like and select Web Editor
- Paste in the following compose configuration:
Adjust the values to match your setup:
- PUID / PGID: The user and group ID that Jellyfin runs as. is the default first user on most Linux systems. Match this to whatever user owns your media files. Run on your host to check your UID and GID
- TZ: Your timezone
- /home/brandon/jellyfin/config: Where Jellyfin stores its database, metadata, and settings. Keep this on SSD storage
- /home/brandon/jellyfin/cache: Transcoding cache and temporary files. SSD is ideal here too
- /mnt/data: Where your actual media files live. This can be a local drive, a mounted NAS share, whatever you have. Inside the container this gets mapped to
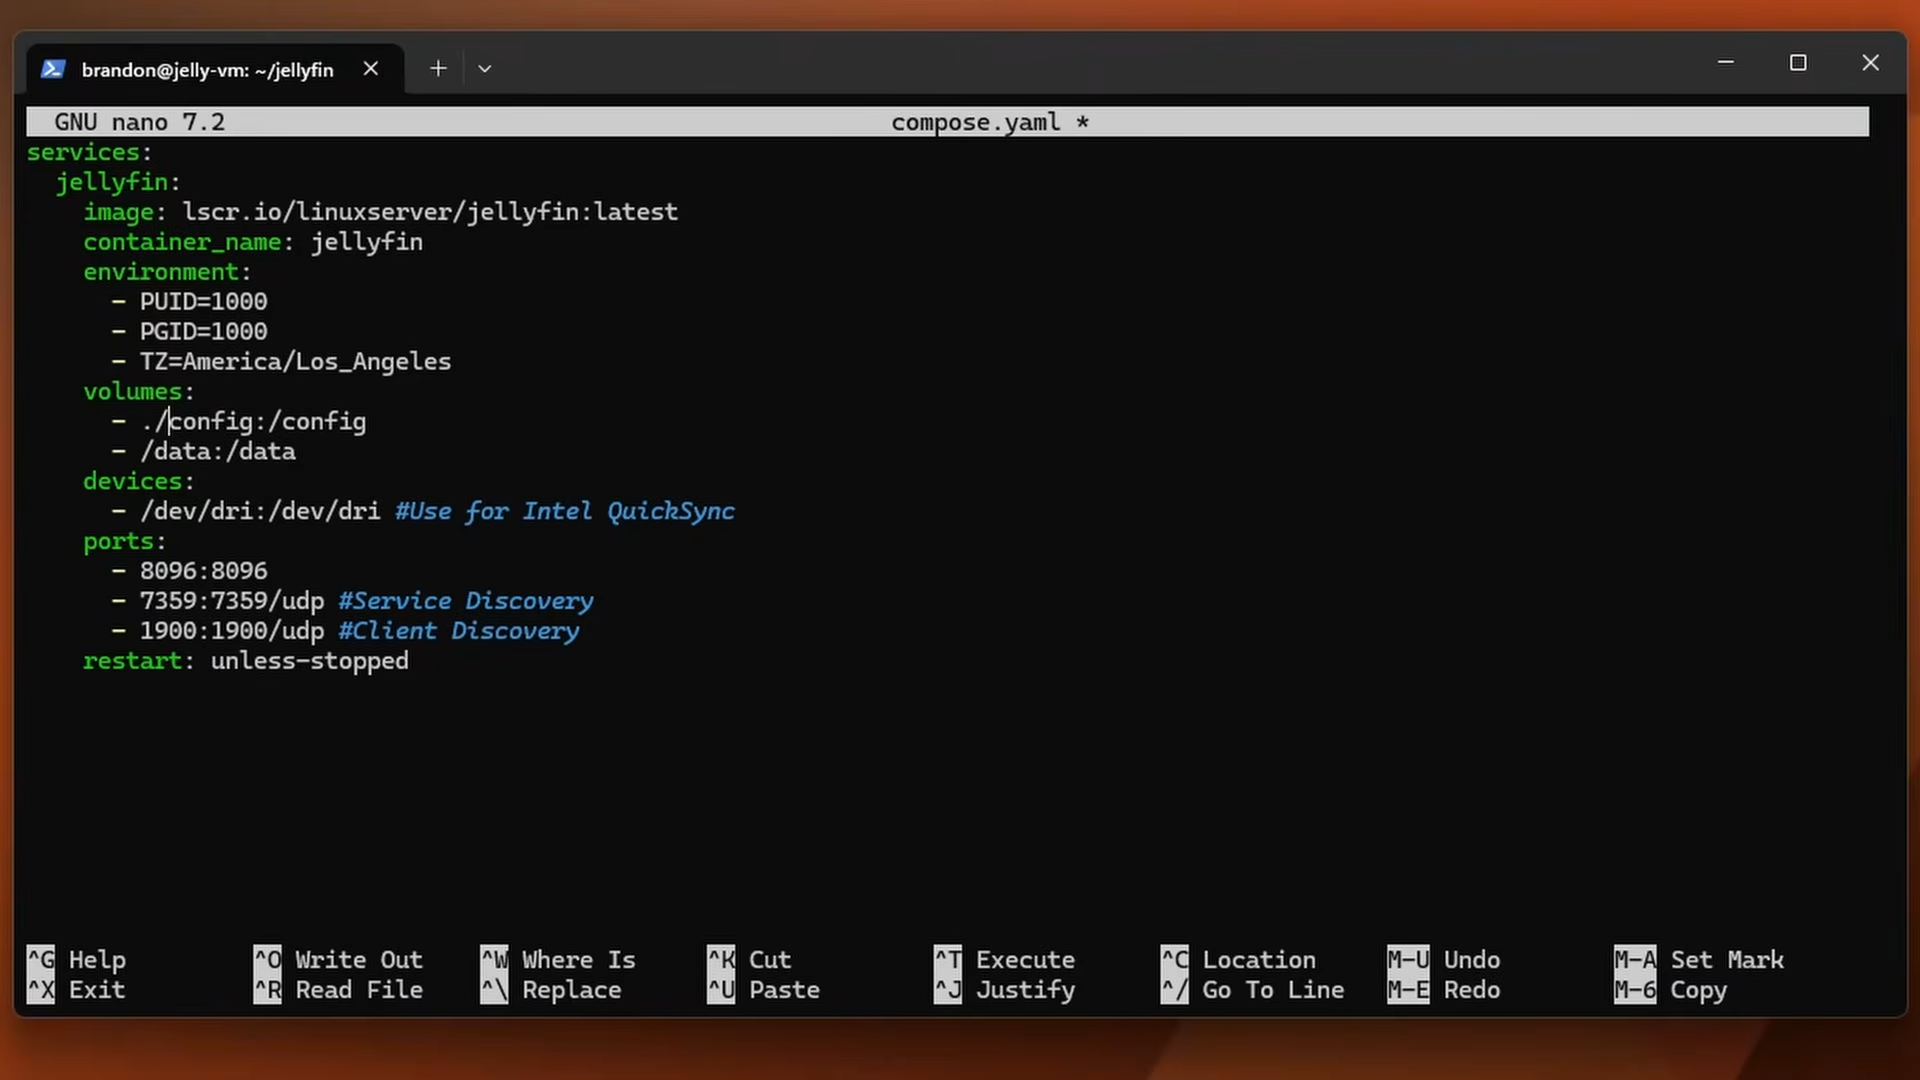
Click Deploy the stack and give it a minute to pull the image.
Storage Considerations
How you organize storage matters more than you'd think. Jellyfin's config directory and media directory serve very different purposes and should live in different places.
Config and cache ( and ): These contain the database, metadata images, subtitles, and transcoding temp files. Put these on SSD storage. The database in particular does not belong on a network share since you'll get corruption and performance issues.
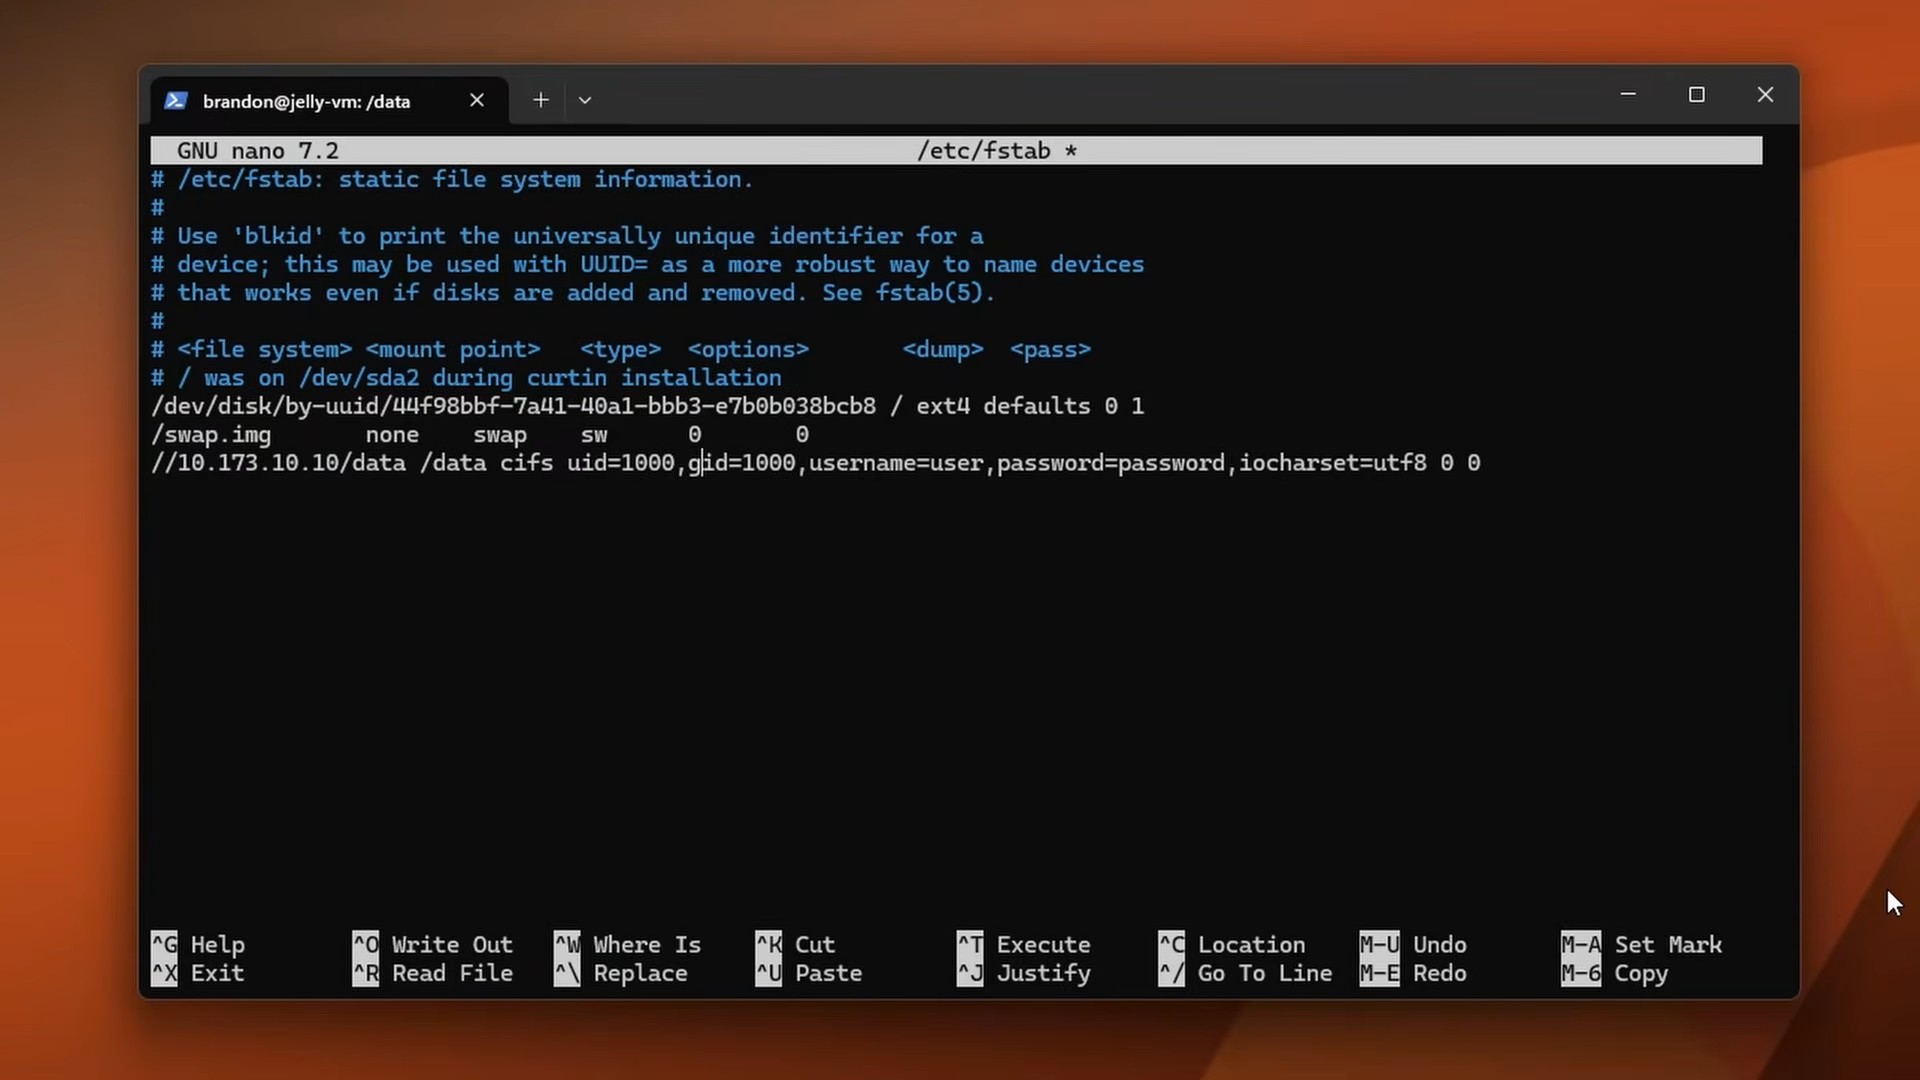
Data (): This is a single directory that holds all your media, mounted into the container as . This can absolutely be a NAS share, a large spinning disk array, or whatever bulk storage you have available. If you're mounting a network share, add it to so it persists across reboots:
Inside your data directory, create subdirectories for each content type. Jellyfin expects a specific folder structure to identify content correctly:
Each movie should be in its own folder with the year in parentheses. TV shows should follow the and naming convention. Jellyfin's scrapers rely heavily on this naming to pull the correct metadata from TMDb .
If Jellyfin is pulling the wrong metadata for a title (common with remakes or movies that share a name), you can add the TMDb ID directly to the folder name to force an exact match: . You can find the ID in the URL of any TMDb page.
Permissions: Make sure the user running Jellyfin (the / you set) has read access to your media directories. If you're getting permission denied errors:
Enabling Intel Quick Sync
If you have an Intel CPU with Quick Sync, hardware transcoding is one of the best upgrades you can make. It offloads video encoding and decoding from the CPU to dedicated hardware on the chip, which means you can transcode multiple streams simultaneously without breaking a sweat.
First, verify the device exists on your system:
You should see and (or similar). If this directory doesn't exist or is empty, Quick Sync either isn't available on your CPU or isn't enabled. Check your BIOS for integrated graphics settings. On some systems, plugging in a dedicated GPU disables the iGPU by default, so you may need to explicitly enable it.
If you're running in a VM on Proxmox, you'll need to pass through the iGPU. Add the device in your VM's hardware configuration.
The compose file we created already includes the device mapping:
This passes the entire DRI subsystem into the container. The Jellyfin container needs access to the render device to use hardware acceleration.
Make sure the container user has permission to access the render device:
Now configure Jellyfin itself. In the web dashboard:
- Go to Administration → Dashboard → Playback
- Under Transcoding, set the hardware acceleration method to Video Acceleration API (VAAPI) or Intel QuickSync (QSV)
- For the VAAPI device, enter
- Enable the codecs your hardware supports. Most modern Intel chips handle H.264, HEVC, and VP9. Newer chips like the N100 also support AV1
- Enable hardware decoding for each codec your chip supports
- Enable hardware encoding as well
- Click Save
To verify it's working, play something that triggers a transcode (change the quality in the player) and check the Dashboard → Active Devices section. You should see the transcode method listed as your hardware acceleration method rather than software.
You can also monitor Quick Sync usage in real-time from the host with . Install it and run it:
This gives you a live view of the GPU engines, including the video encode and decode blocks. When a transcode is active, you'll see the Video and VideoEnhance engines light up. If those stay at zero while Jellyfin is transcoding, something isn't configured correctly. It's the quickest way to confirm hardware acceleration is actually being used.
First Boot and Library Setup
Once the stack is deployed and all containers show as running in Portainer, access Jellyfin at .
You'll be greeted with the initial setup wizard:
- Language: Pick your preferred language
- User: Create your admin account. This is your primary login, so use a strong password
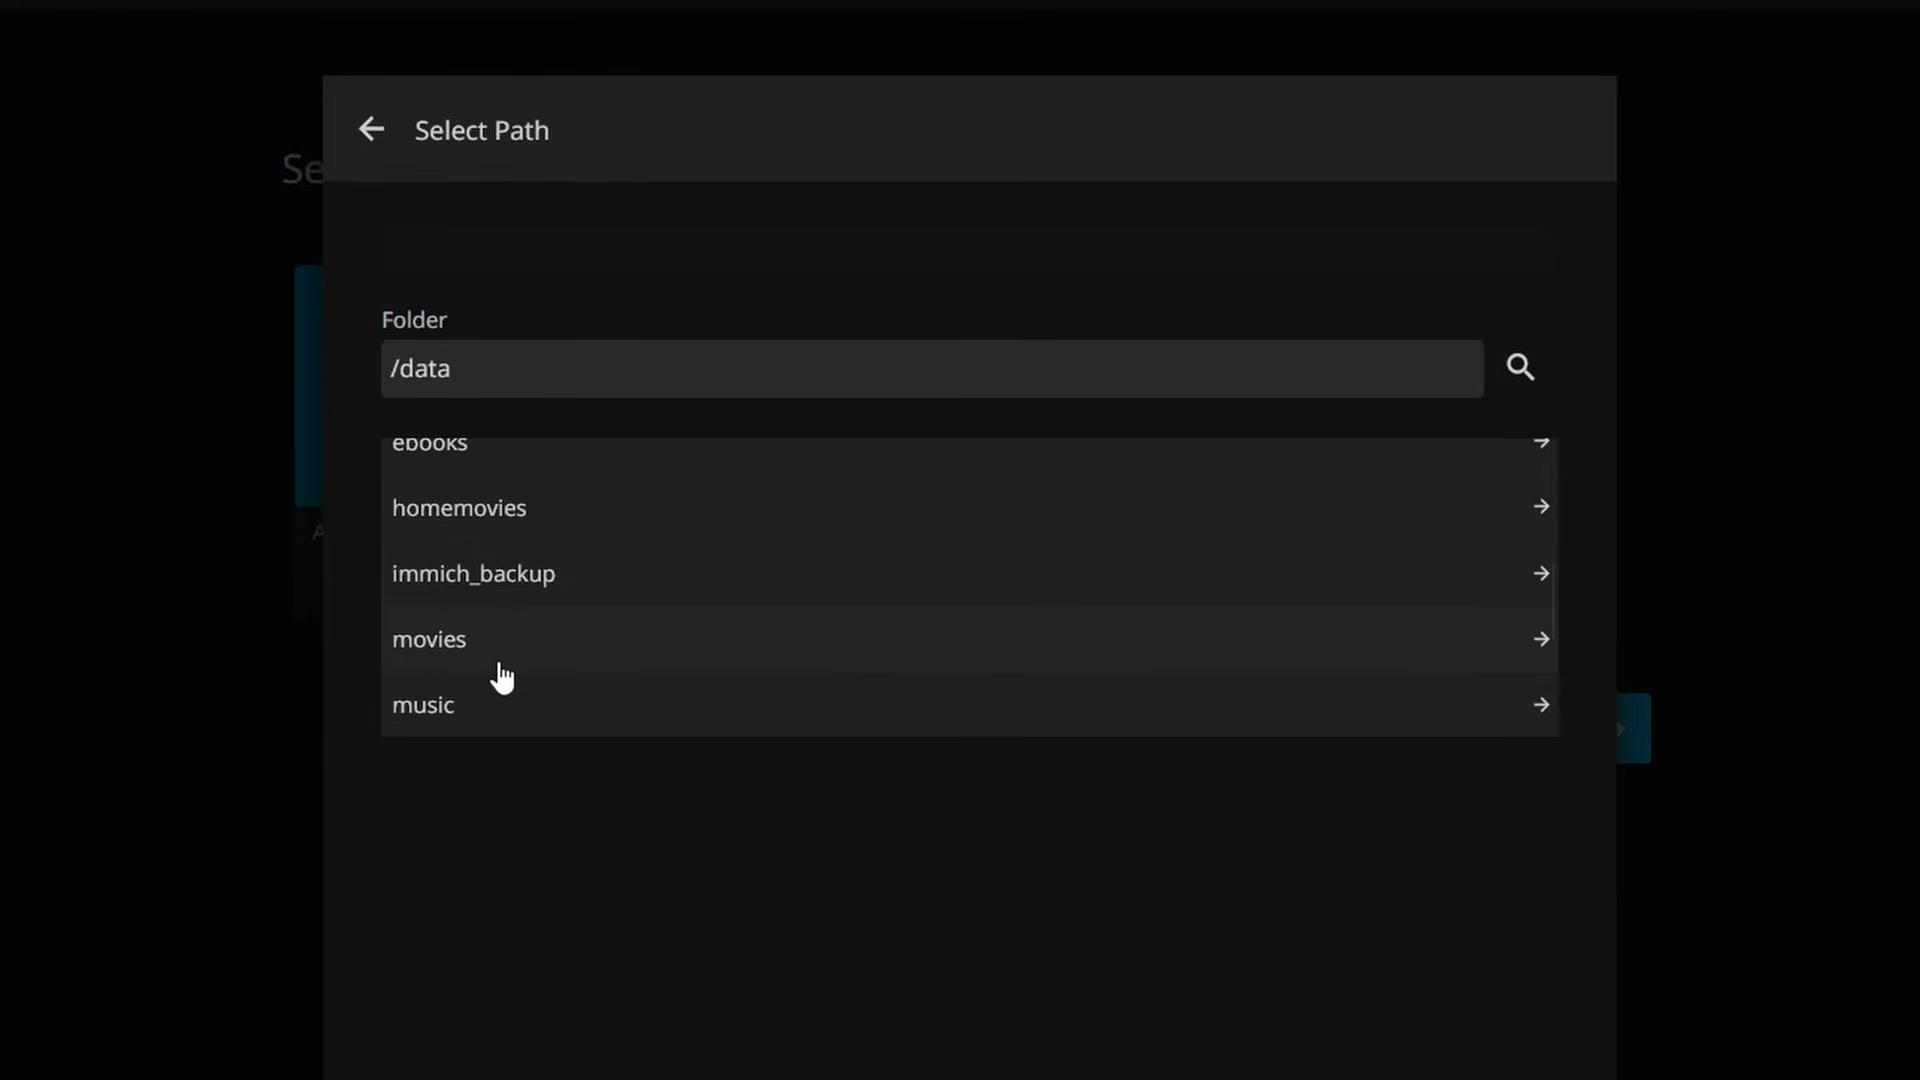
- Media Libraries: This is where you add your content. Click Add Media Library and configure each one:
- Movies: Set the content type to "Movies", add the folder path , and select your preferred metadata language and country
- TV Shows: Set content type to "Shows", folder path
 4. Metadata Language: Set your preferred language and country for scraping
5. Remote Access: Leave the defaults for now, we'll handle remote access with NetBird
4. Metadata Language: Set your preferred language and country for scraping
5. Remote Access: Leave the defaults for now, we'll handle remote access with NetBird
After completing the wizard, Jellyfin will start scanning your libraries. Depending on how much media you have, this can take anywhere from a few minutes to several hours. You can monitor the progress under Administration → Dashboard.
A few settings I recommend checking after the initial scan:
Library scan schedule: Under each library's settings, you can set up scheduled scans so new content gets picked up automatically. I do a scan every 12 hours, but you can also trigger them manually or set up filesystem monitoring.
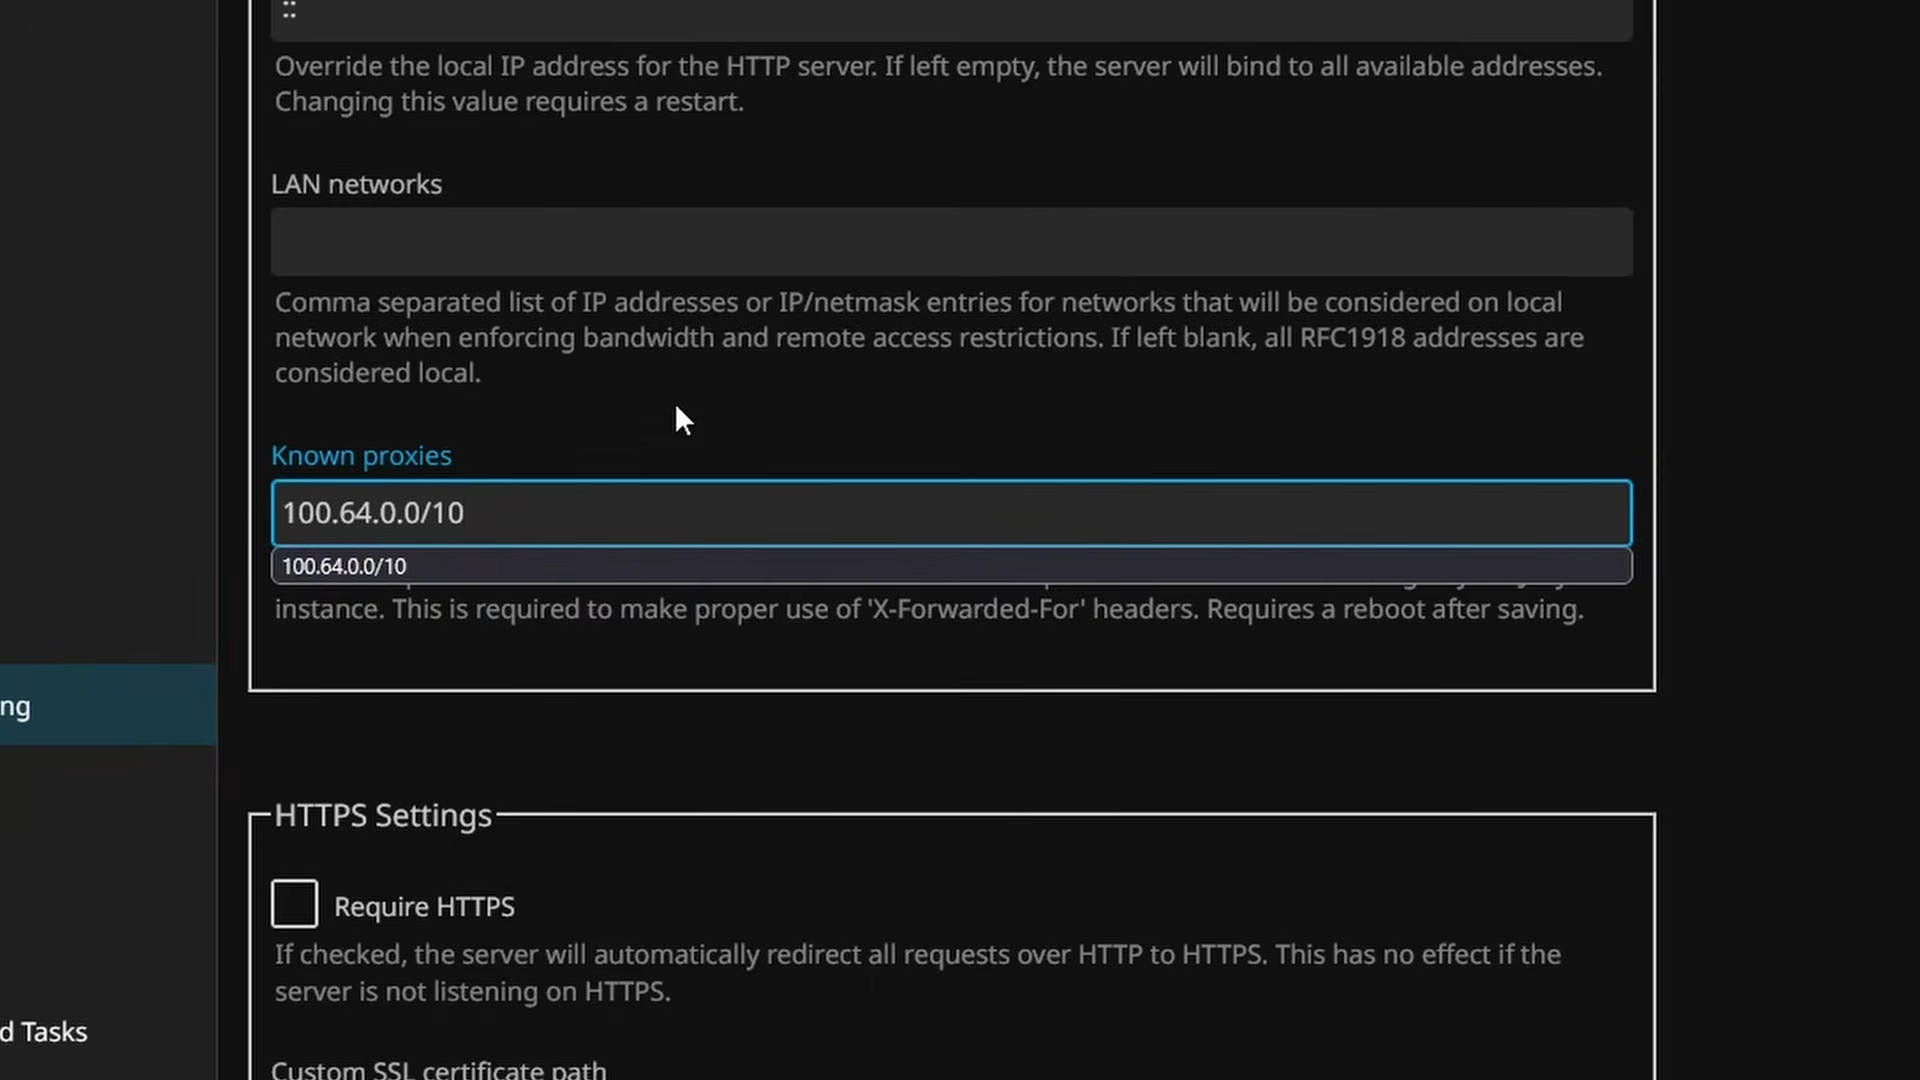
Networking: Under Administration → Networking, make sure the local addresses and known proxies are configured correctly. If you're only using NetBird for remote access, you don't need to touch the remote access settings here.
Users: If other people will be using your server, create individual accounts under Administration → Users. You can control what libraries each user can access, whether they can download content, transcode limits, and more.
Remote Access with NetBird
Exposing Jellyfin directly to the internet with port forwarding is asking for trouble. Instead, we'll use NetBird to create a secure connection. There are two approaches: direct peer-to-peer access where every client device runs NetBird, or using NetBird's reverse proxy to expose Jellyfin through a custom domain with an SSL certificate. We'll cover both.
Option 1: Direct Peer-to-Peer Access
Install NetBird on your Ubuntu Server:
Then connect it to your NetBird network using a setup key. You can create a setup key in the NetBird dashboard under Setup Keys. Give it a name like and assign it to your preferred group:
Head over to the NetBird dashboard and verify your server shows up under Peers. It should appear with the hostname you set during Ubuntu installation.
Now create an access policy so your devices can reach Jellyfin. In the NetBird dashboard:
- Go to Access Policies
- Create a new policy
- Set the source group to your personal devices (or whatever group your clients belong to)
- Set the destination to the group your Jellyfin server is in
- You can restrict it to port 8096 (Jellyfin's web interface) and port 9443 (if you want remote Portainer access) under the policy's protocol and port settings
Once the policy is active, any device on your NetBird network that matches the source group can reach Jellyfin using the NetBird IP or DNS name. Open a browser and navigate to and you should see the Jellyfin login page, no matter where you are.
This also works for all the Jellyfin client apps. Just use the NetBird address as the server URL when setting them up. NetBird has native clients for Apple TV and Android TV, so you can install it directly on your streaming device and access Jellyfin without needing to set up a VPN on your router or run NetBird on a separate device. Your TV becomes a peer on the network just like your phone or laptop.
Option 2: NetBird Reverse Proxy
If you don't want to install NetBird on every client device, you can use NetBird's reverse proxy feature to give Jellyfin a public-facing domain with an automatically issued SSL certificate. This is great for sharing access with family or friends who don't have NetBird installed.
For media streaming, self-hosted NetBird is strongly recommended. Streaming large 4K files uses a lot of bandwidth, and with a self-hosted setup there are no usage limits since the traffic stays on your infrastructure.
First, make sure your Jellyfin server's IP is within a network configured in NetBird with routing peers that can forward traffic to it. Then in the NetBird dashboard:
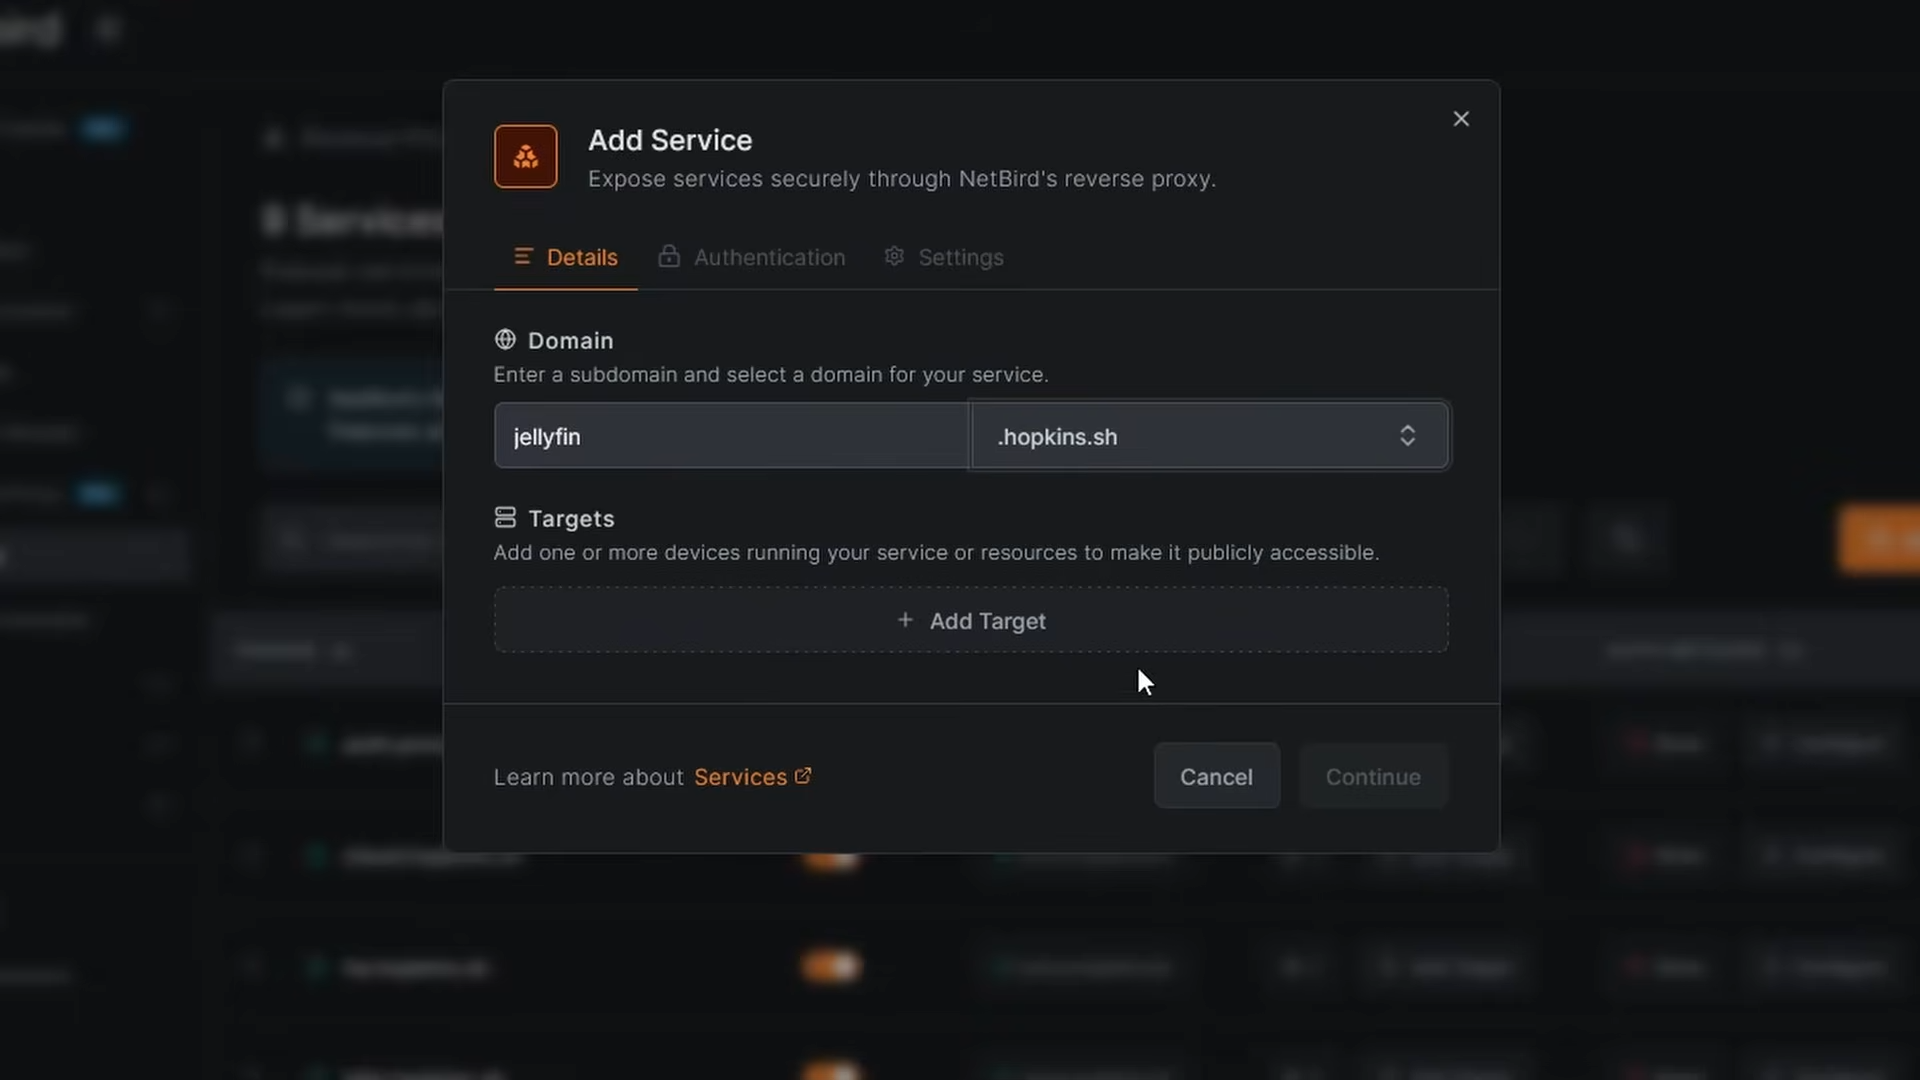
- Go to Proxies and click Add Service
- Give it a name like
- Pick your domain—you can use your own custom domain or a NetBird proxy domain
- For the target, select your network resource and enter the Jellyfin server's IP address with port 8096
- Click Add Target
- For the authentication step, skip the additional authentication if you plan to use Jellyfin apps on mobile or TV—the extra auth layer will break those client connections since they can't handle it. Only enable it if you're exclusively using the web browser
- Click Add Service
NetBird will automatically issue an SSL certificate for your domain. Once it's ready, you can access Jellyfin at from anywhere.
There's one more step inside Jellyfin. Go to Administration → Dashboard → Networking and add the NetBird IP range (e.g., ) under Known Proxies. This tells Jellyfin to trust the proxy connection so everything works correctly. Click Save.
Backup and Restore
One thing that catches people off guard: Jellyfin applies database migrations immediately when you upgrade, and you cannot downgrade without a backup from before the upgrade. If an update goes wrong, you're stuck unless you have a prior backup.
Back up the config directory regularly—that's where the database, metadata, user accounts, and all your settings live. The media files themselves don't need to be part of the Jellyfin backup since they're just files on disk.
Before backing up, stop the Jellyfin container first to avoid database locks:
Then copy or archive the config directory:
Start the container again when you're done:
Consider automating this on a schedule with a cron job, especially before major version upgrades.
Wrapping Up
That's Jellyfin running on Docker with Portainer, hardware transcoding enabled, and remote access through NetBird. You've got a fully functional media server that you can reach from anywhere without exposing anything to the public internet.
From here, there's a lot more you can explore:
- Jellyfin clients: Install the apps on your Android TV , Fire TV , iOS , Android , or Roku devices. The web player works great too for desktop use. Since NetBird runs natively on Apple TV and Android TV, you can pair the Jellyfin client with the NetBird client on the same device for remote streaming without any extra infrastructure
- Live TV & DVR: If you have an HDHomeRun or other tuner, Jellyfin can handle live TV and DVR recording
- Plugins: There's a plugin ecosystem for things like Intro Skipper , additional metadata providers, anime support with AniList, and more
- SyncPlay: Watch content together with friends or family in real-time, synchronized across devices
- Subtitles: Jellyfin can automatically fetch subtitles from OpenSubtitles with the right plugin configured
- Companion apps: Tools like Seerr for media requests and Jellystat for usage analytics pair well with Jellyfin
The official Jellyfin documentation is a great resource for all of this. The community on Reddit and the Jellyfin Forum is also genuinely helpful if you run into issues.
Your media, your server, your rules.