
Control Center in the NetBird dashboard has always been a nice way to see who can reach what. You pick a peer, a user, a group, or a network, and it draws the whole thing out for you. Sources on the left, policies in the middle, resources on the right. Super handy for audits and for figuring out why some host can suddenly hit the database.
The thing is, it was mostly a viewer. If you wanted to change something, you clicked a policy and edited it right there against your live network. Which is fine for a quick port tweak, but not what you want when you're standing up a whole new environment or restructuring how a team gets access.
Looking back, that first version was doing more than just drawing a picture though. When we launched Control Center last year, the real work was getting the canvas to speak the same language as the rest of NetBird. Every card on it is a real peer, group, or resource, every line is a real policy, and every network frame maps to an actual network in your account. Once you have a diagram that's wired that tightly to the real thing, the natural next question is, well, why can't I just draw the change I want?
That's what this release is. With NetBird dashboard v2.92.0, Control Center gets a Draft mode, and the map turns into the editor. You switch the canvas into a scratch space, build out everything you want, and nothing touches your network until you review it and hit deploy. Let's dive into how it works. If you want the step-by-step version with one worked example, the Draft Mode docs have that.
Live and Draft
Up in the top right of Control Center you'll now see a little Live / Draft switcher. Live is exactly what you had before. Click Draft and you get two options:
- From Current View takes whatever is on your canvas right now and turns it into an editable draft. Same layout, same groups and policies, just now you can move things around and add to it.
- New Empty Draft gives you a blank canvas. This is the one I reach for when I'm designing something from scratch.
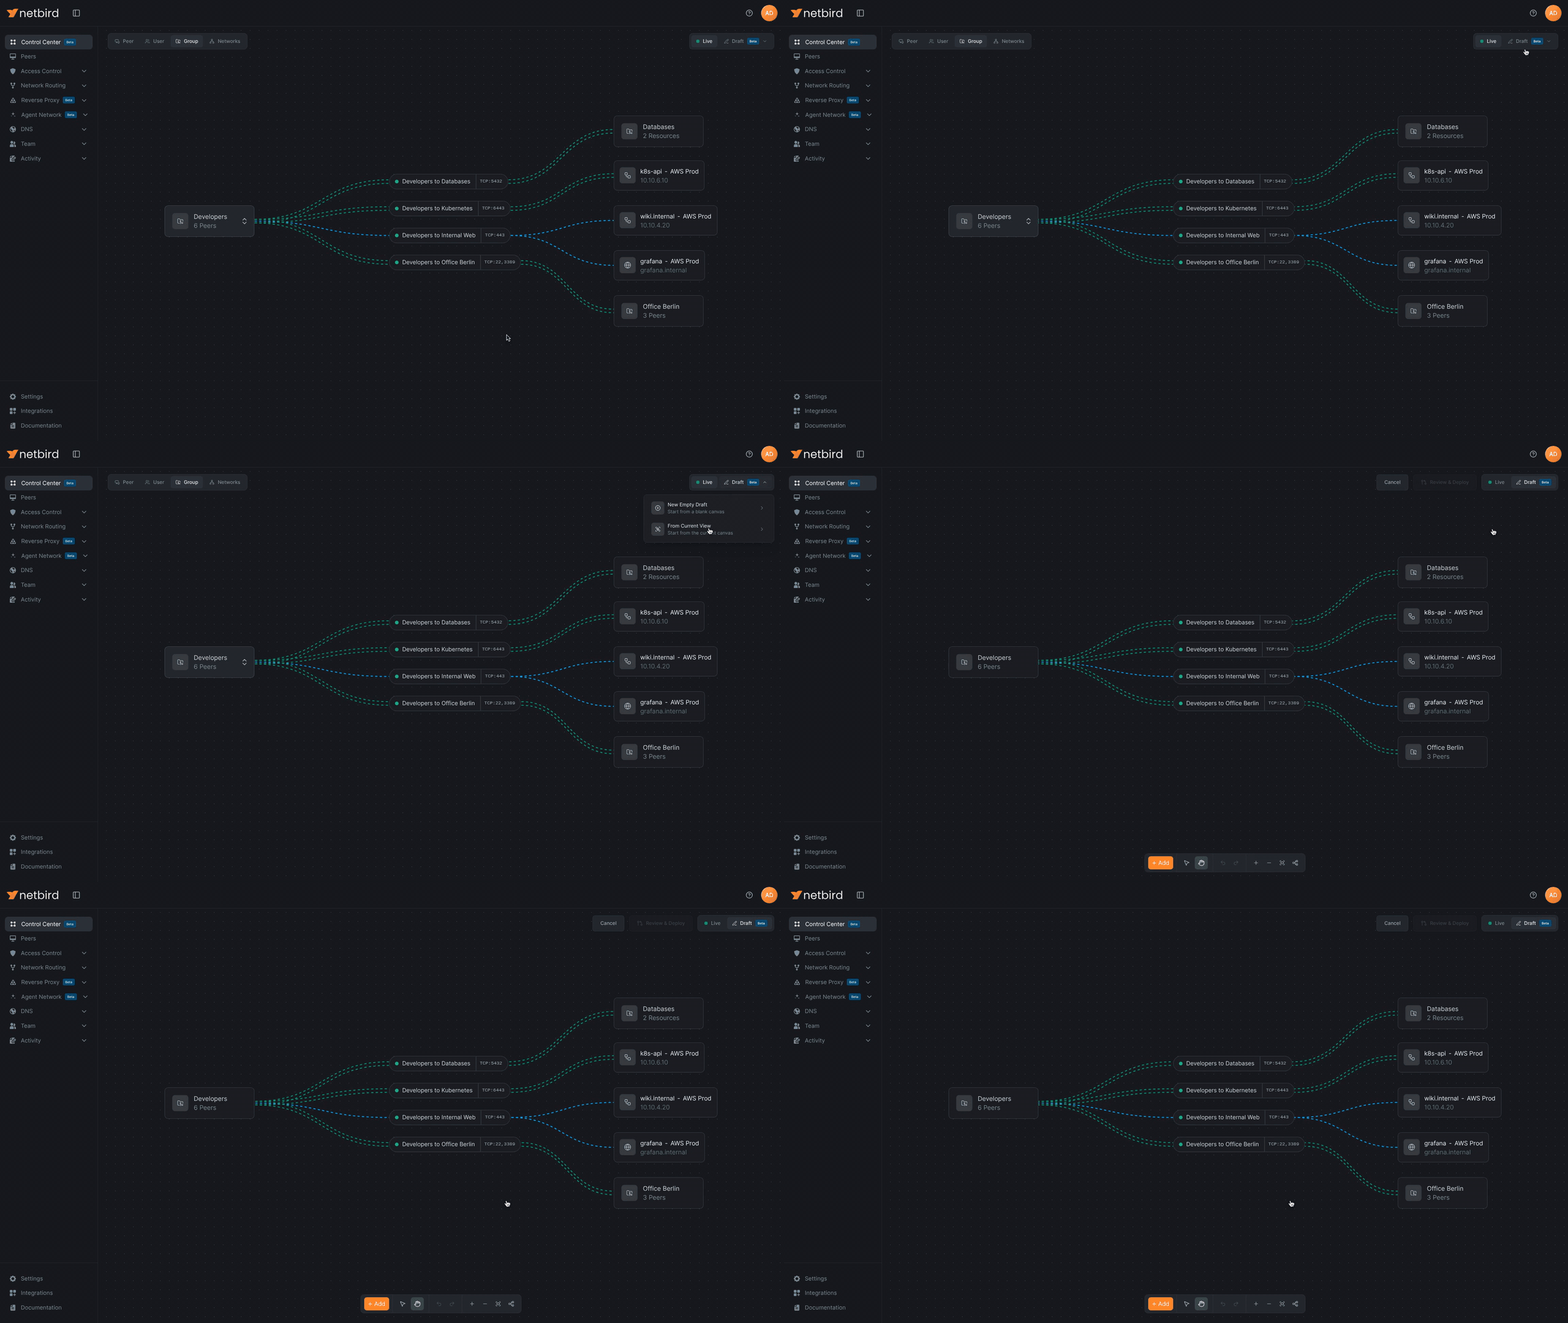
Once you're in a draft, a Cancel button and a Review & Deploy button show up in the header, and a toolbar slides in at the bottom with Add, select and hand tools, undo and redo, zoom, fit to view, and auto arrange. Pretty much what you'd expect from a canvas editor.
Do note that a draft lives only in your browser tab. It's not saved anywhere, so if you reload the page it's gone and the canvas rebuilds from live (the browser will warn you first, but there's no getting it back). That's on purpose, but it does mean you want to finish a draft in one sitting, or at least get it deployed before you close the tab.
Adding Things
Hit Add (or press ) and a components panel pops up with four categories: Peers, Policies, Groups, and Networks & Resources. Each one has an "Add New" section with templates, plus a searchable list of everything that already exists in your account so you can drag those onto the canvas too. Anything already on the canvas is marked so you don't add it twice.
The templates are:
- Server and Agent, which are placeholder peers for machines that don't exist yet. They work the same way, just pick whichever matches the machine's role. More on those in a second.
- Policy, a blank policy pill you connect sources and destinations to.
- Group, a new group.
- Network, a new network frame that resources can live inside of.
- Resource, a host, subnet, or domain. This one opens the resource editor right away because a resource without an address isn't really a resource.
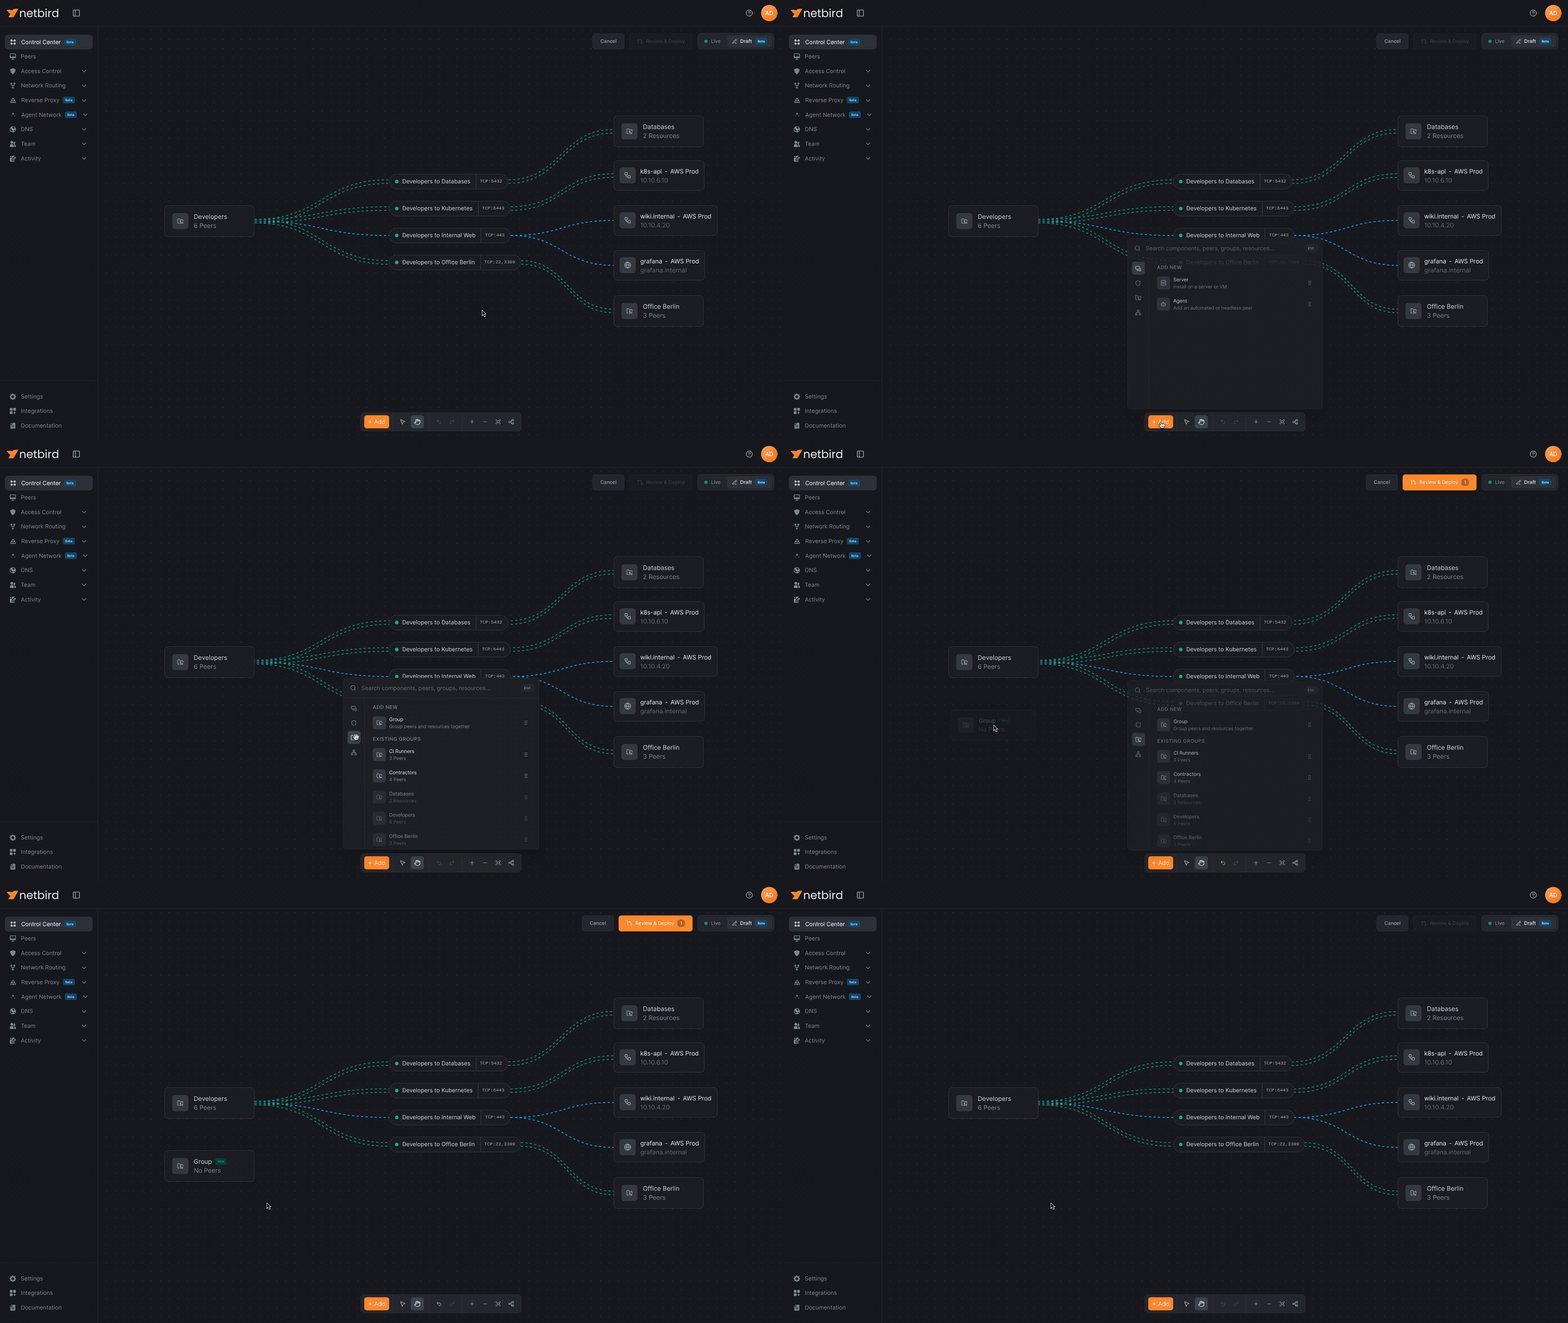
Everything is drag and drop. Grab a row, drop it where you want it on the canvas, and there it is, with a little NEW badge so you can tell drafted stuff apart from live stuff. You can also right click the empty canvas and get the same "New Server, New Agent, New Policy..." options there, or press through to drop one in at the center of the view.
Right click any node to rename it. Drag a peer onto a group and the group absorbs it and bumps its member count. Or drag a selection box around a handful of peers and hit Create Group (or press ) to make a group out of them in one go.
Connecting Things
This is the part where everything comes together. Hover over any group, peer, or resource and connect handles appear on its sides. Drag from one onto a policy's left side and it becomes a source. Drag onto the right side and it becomes a destination. Same idea when you connect two nodes directly: drag from a node's right handle and it's the source, from its left handle and it's the destination. That's it, the edge draws in and the change gets tracked.
Drag from a group straight onto another group (or a peer onto a resource) and NetBird opens the normal policy editor prefilled with both sides and a name like "Contractors to Databases." Set your protocol and ports, save, and a new policy pill appears between them with the edges already drawn.
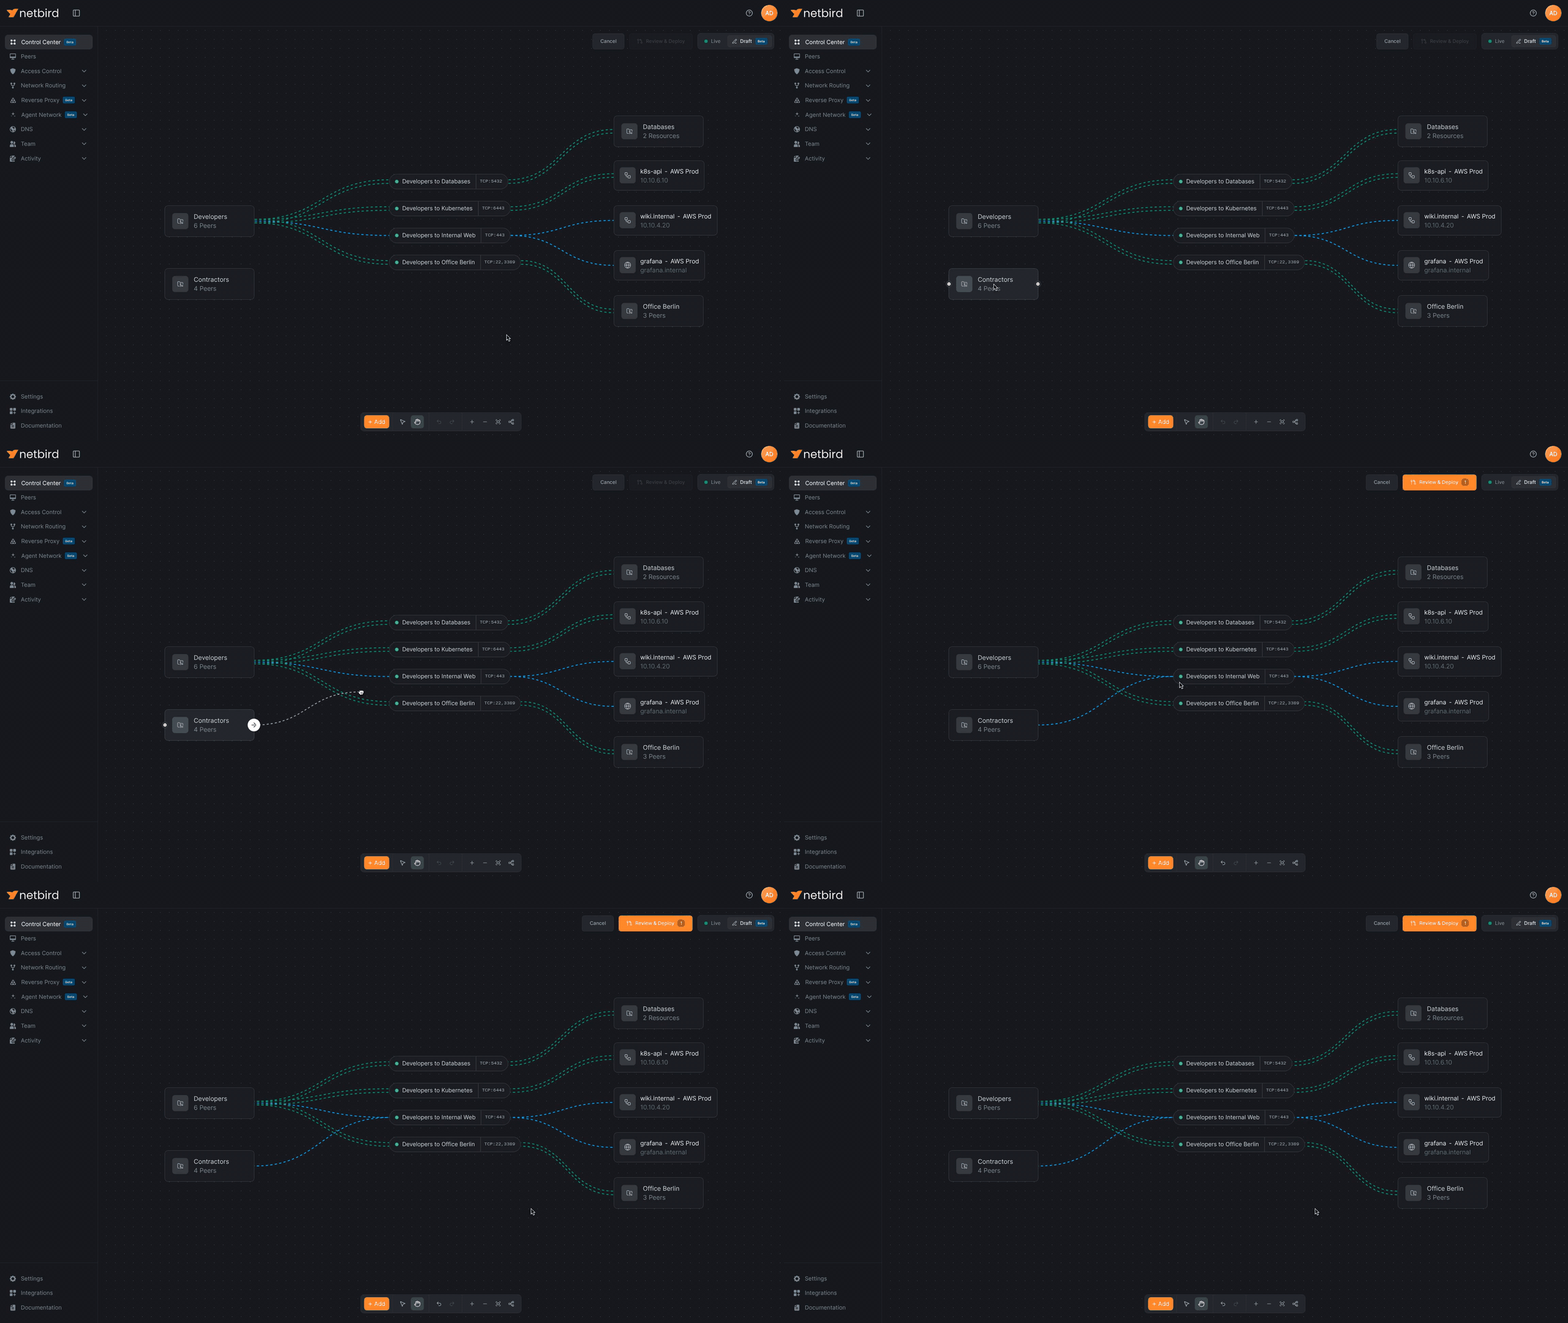
A couple of rules worth knowing. A policy side holds either groups or a single peer or resource, not both, so if you drop a group onto a side that already has a peer it just refuses. And a policy with only one side connected stays canvas-only. It doesn't show up in the changeset until both sides are set, because the API won't accept a rule that authorizes nothing.
Networks work the same way. Drop a resource onto a network frame to assign it (the frame gives a little pulse when it lands). Drag a policy onto a frame and you get a picker for which resource or group inside that network you mean. Right click a frame to add a routing peer, edit it, or remove it.
Placeholders for Machines You Haven't Built Yet
This is my favorite bit. Say you're setting up a new build server. You drop a Server placeholder on the canvas, name it, put it in a group, connect it to the policies it needs, and keep going. Hover over the card and there's an Install button.
Click it and you get the normal NetBird install modal. Hit Generate a setup key and you get one tied to that placeholder. Run the install command on the real machine, and when it registers, the placeholder swaps itself out for the real peer, right there in your draft, and it inherits the name, the group membership, and all the policies you connected to it. The card says "Waiting" while that's happening, so you can go do the install and come back. The temporary setup key gets deleted once the peer is in.
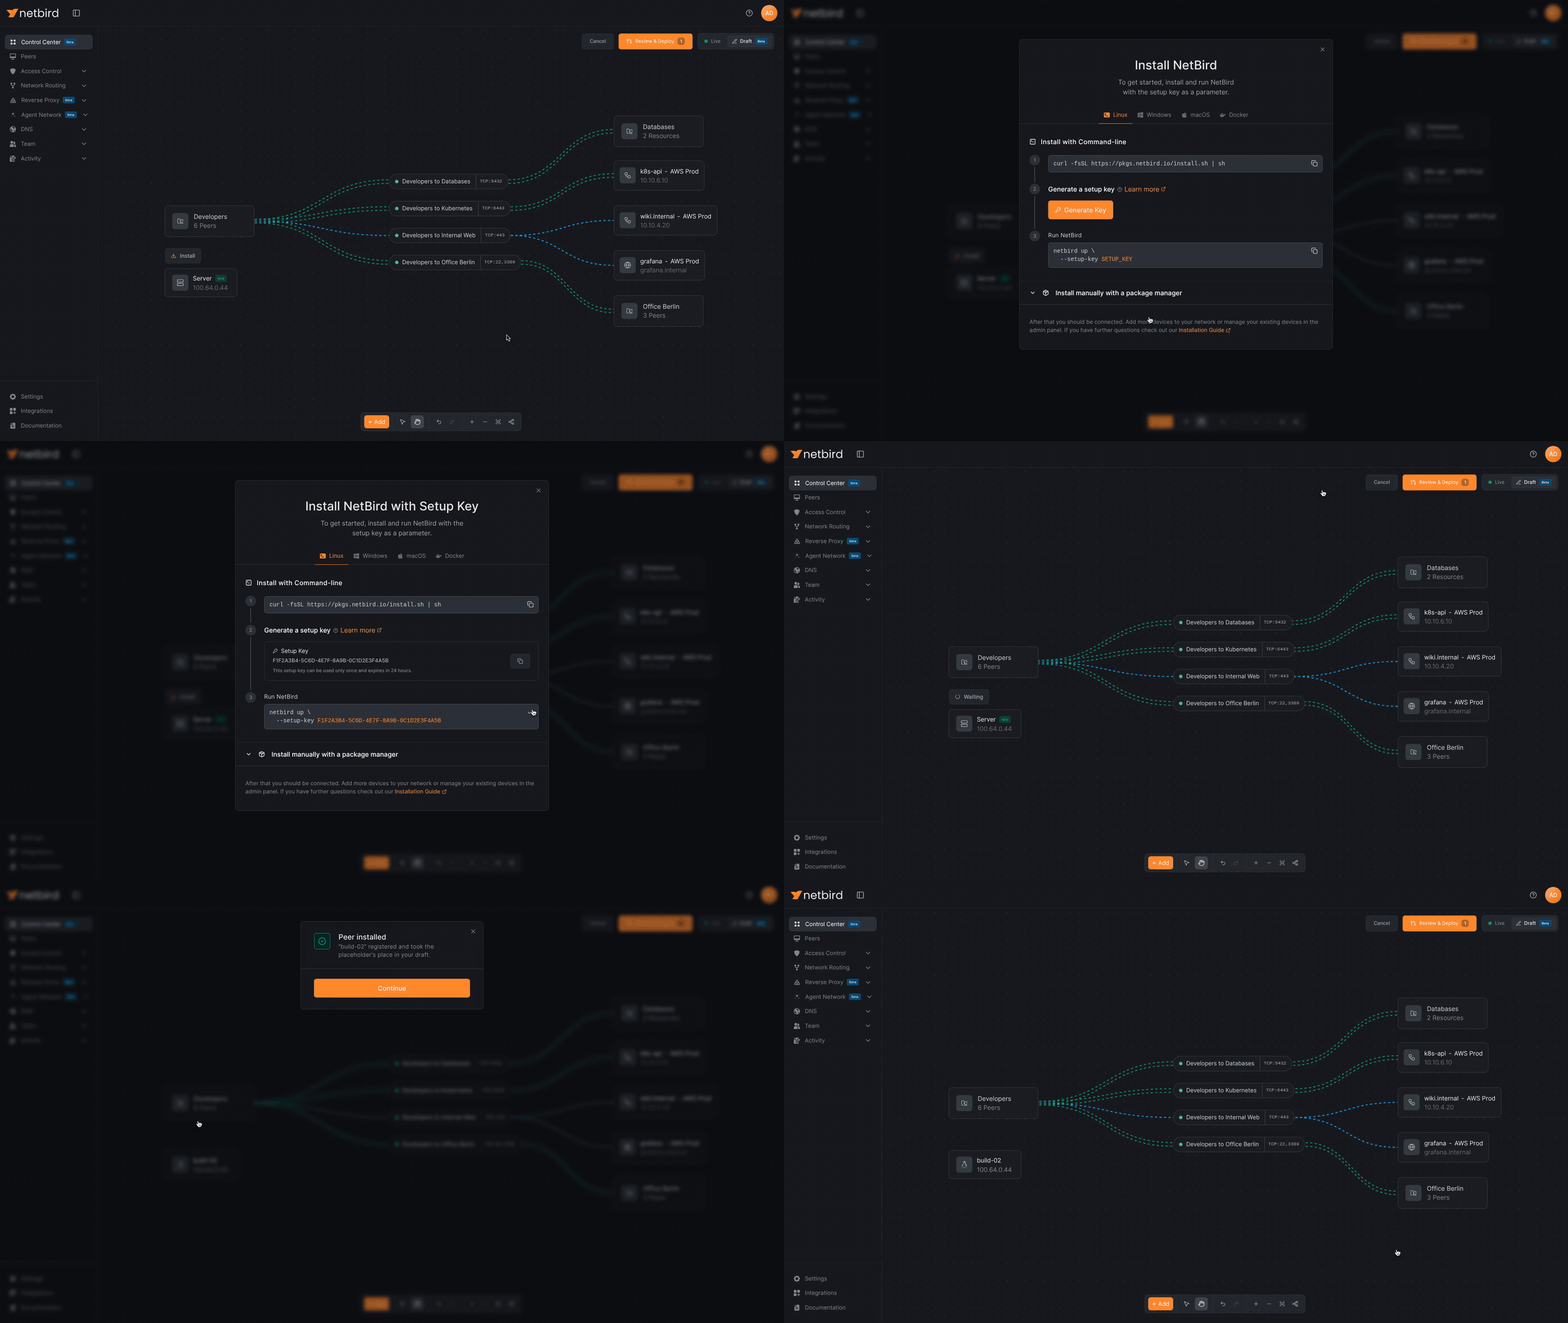
Do note that generating a setup key is a real action against your account, not something that waits for deploy. It also needs a role that can create setup keys, which Network Admins can't. More on that below.
Review & Deploy
Every change you make shows up as a count on the Review & Deploy button. Click it and you get a list of exactly what's going to happen, in the order it's going to happen in: groups first, then networks, resources, routing peers, policies, and deletes last (that ordering matters because you can't delete a group that a policy still references).
Each row shows the entity, the actual API call (, , so on and so forth), and a badge. Add, Modify, or Delete, or a diff stat like for edits. Expand a row and you see the JSON request body as a diff, green for what's being added and red for what's going away. You can copy any row as a cURL request, which I think is a really thoughtful touch for anyone who wants to script the same thing later.
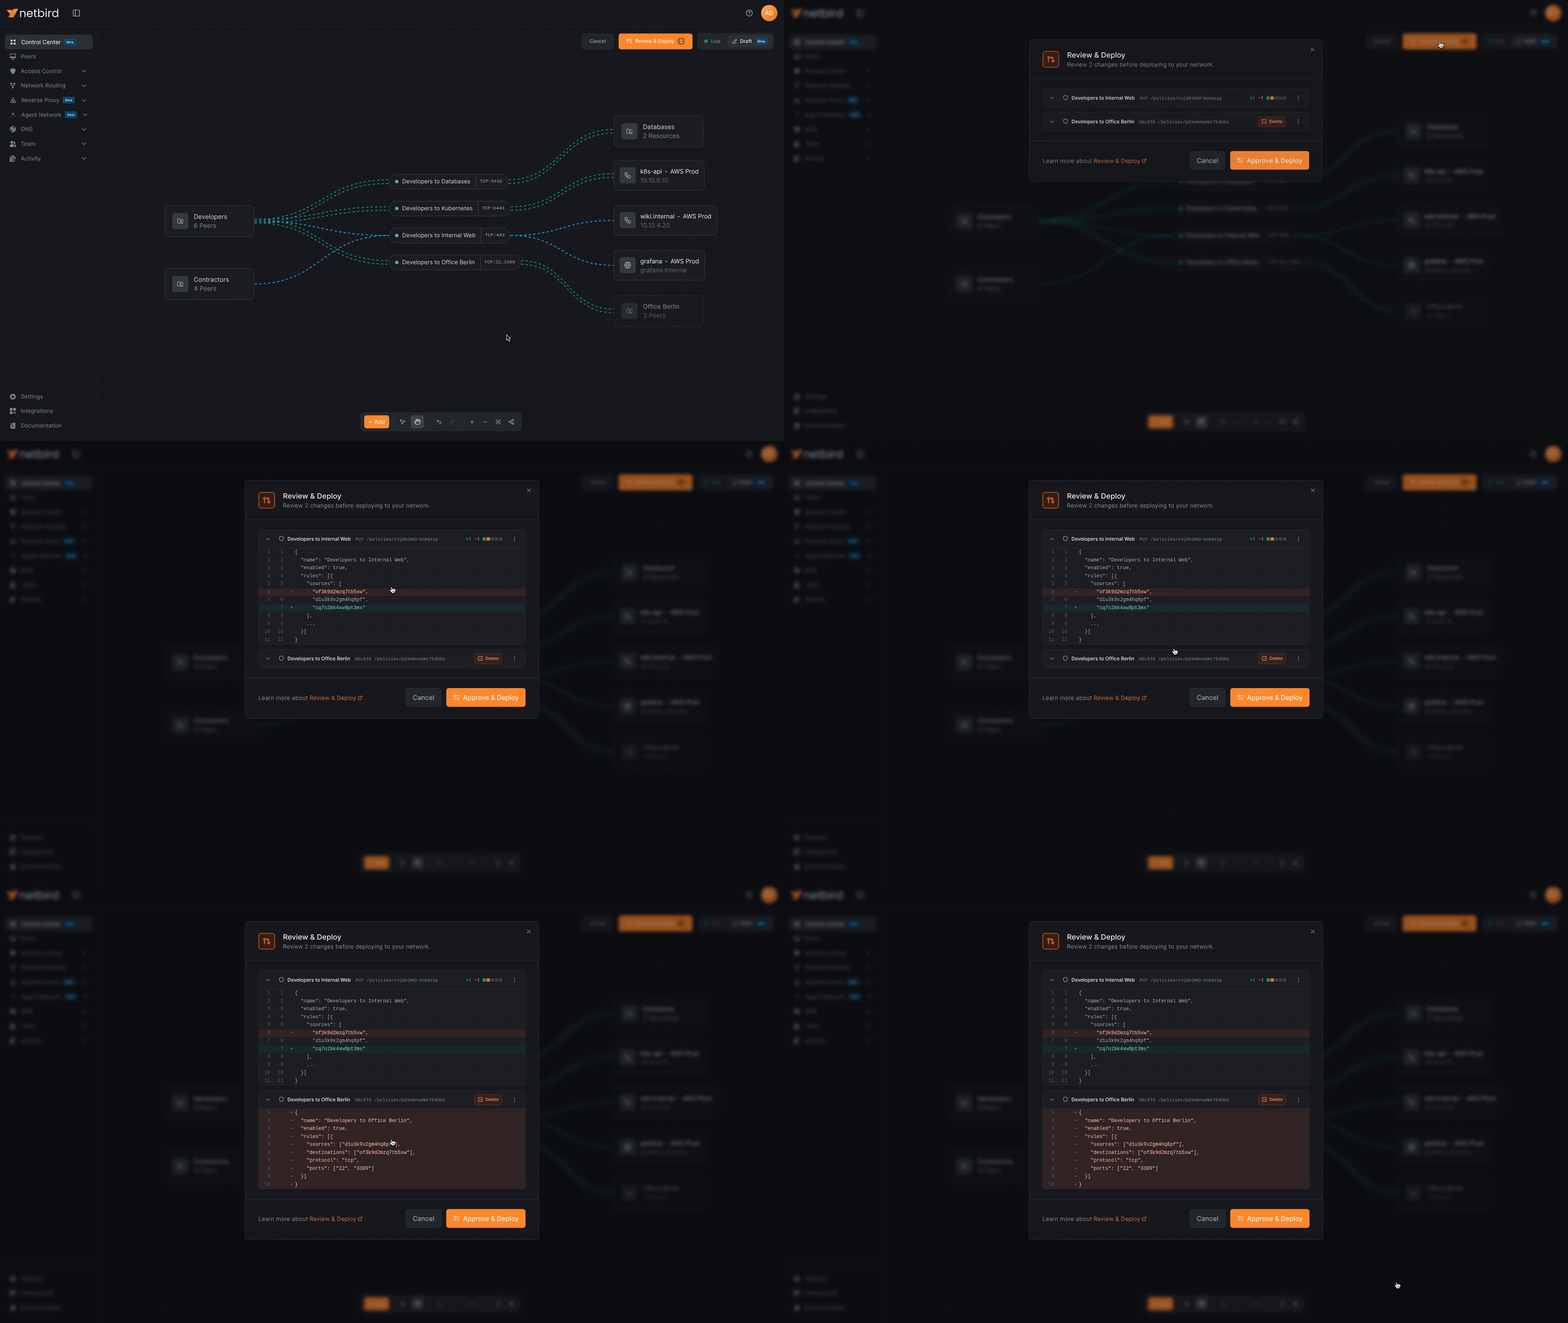
If something isn't ready, the row gets an amber issue badge instead and the deploy button is disabled with a "Resolve issues before deploying" tooltip. The two you'll run into are:
- Install, a placeholder peer that hasn't registered yet.
- No Network, a resource that isn't assigned to a network.
Both of those are clickable and jumps you to the fix. Once they're clear, hit Approve & Deploy and you watch the rows go through one at a time with a spinner and then a green check. When it's done you get a "Deploy complete" toast, the draft closes, and you're back in Live looking at the real thing.
If a call fails mid-way, the deploy stops right there and you get a "Deploy failed" toast. Nothing after the failed row runs. The rows that already went through keep their green check, so when you fix the problem and hit Approve & Deploy again it picks up from where it stopped instead of creating everything twice. That kind of detail is easy to skip and I'm glad they didn't.
Changing Your Mind
Undo and redo work the way you'd hope, including for deletions. Delete a live group and every policy that referenced it gets a Modify row stripping it out. Undo the delete and all of that comes back.
Any change can be removed straight from the review list too. Right click the row (well, click the three dots), hit Remove, and a confirmation shows you exactly what it's going to revert on the canvas before it drops out of the changeset.
One thing worth getting straight: Remove and Delete are different. Remove just takes something off the canvas and never touches your network, so it doesn't even ask. Delete is only offered for things that actually exist in your account, always asks, shows up as a red row in the review, and happens at deploy. If you remove an existing group from your draft, it's still in your network.
And if you want to bail on the whole thing, Cancel or clicking Live asks "Discard draft changes?" when you have pending work. Same if you try to navigate away using the sidebar. Placeholder setup keys you generated get revoked on the way out, which is the right call since those are live credentials.
A Few Things to Know
- Draft mode is available on NetBird Cloud (all plans) and self-hosted. You need dashboard v2.92.0 or newer. It's all in the dashboard, so no management server upgrade is required.
- Deploying a draft does the same operations as making those changes on the regular dashboard pages, so it needs the same permissions. Admin and Network Admin roles both work, with one exception: installing a placeholder creates a setup key, and Network Admins can't do that. They'll need an Admin to run the install step or remove the placeholder before deploying.
- Drafts are per tab and not persisted. Finish or deploy before you close it.
- Placeholder servers get a real setup key and a temporary group named after the placeholder while the draft is open. Those show up in your group list until the draft exits. Not a bug.
- There's a full set of keyboard shortcuts. for the components panel, and for select and hand, to fit to view, to auto arrange, to focus a node and dim everything else. The docs have the whole table.
- It's Beta. The core flows are solid in my testing, but if you hit something odd there's a Feedback button right in the canvas.
Where I'd Use It
For me the sweet spot is onboarding. New team, new environment, new set of servers. I can lay the whole thing out, connect the policies, drop placeholders for the machines that aren't racked yet, and then hand the review list to whoever needs to sign off on it before anything is live. The JSON diff is basically a change request that writes itself.
It also just makes Control Center a lot more useful day to day. Even a small change like adding a group to a policy is nicer when you can see the edge draw in, look at the exact that's about to happen, and then deploy it. That said, for a one-off tweak like widening a port range on a single policy, clicking it in the Live view still works. Draft mode earns its keep when a change spans a few components or needs a machine that isn't installed yet.
A big shoutout to Eduard Gert , front end developer here at NetBird, for the work on Draft mode. The canvas editor, the placeholder install flow, the review dialog with the JSON diffs, all of it. The amount of care that went into the little details really shows.
Go ahead and update your dashboard, open Control Center , and click Draft. If you build something neat with it, I'd love to see it. With all that, I do hope you enjoyed this. Have a great one.